A bite of GoLang(浅尝GoLang),本文只是Go语言的冰山一角,本文包含作者学习Go语言期间积累的一些小的经验,同时为了方便让读者了解到Go语言中的一些概念,文中包含了许多快速简洁的例子,读者后期可以去自行拓展。当然写这篇文章的灵感来源于GitHub上的 a bite of Python
// byte is an aliasfor uint8 andis equivalent to uint8 inall ways. It is // used, by convention, to distinguish byte values from 8-bitunsigned // integer values. type byte = uint8
// rune is an aliasfor int32 andis equivalent to int32 inall ways. It is // used, by convention, to distinguish character values from integer values. type rune = int32
通过别名的方式就可以拓展了,比如
1 2 3 4 5 6 7 8 9 10 11 12 13
type T1 struct{} type T3 = T1 func(t1 T1)say(){} func(t3 *T3)greeting(){} funcmain() { var t1 T1 // var t2 T2 var t3 T3 t1.say() t1.greeting() t3.say() t3.greeting() }
当然要是T1也定义了 greeting 的方法,那么编译会报错的,因为有重复的方法定义。
2、使用组合
比如我们想扩展上面的树的包,实现一个自己的中序遍历,该如何实现呢?通过代码来理解一下使用组合的概念
1 2 3 4 5 6 7 8 9 10 11 12 13 14 15
type myNode struct{ node *tree.Node }
func(myNodeNode *myNode)Traverse() {
if myNodeNode == nil || myNodeNode.node == nil { return } left := myNode{myNodeNode.node.Left} right := myNode{myNodeNode.node.Right} left.ownFunc() myNodeNode.node.Print() right.ownFunc() }
// Stringer is implemented by any value that hasa String method, // which defines the ``native'' format for that value. // The String method is used toprintvalues passed asan operand // to any format that accepts astringortoan unformatted printer // such asPrint. type Stringer interface { String() string }
// NewScanner returns a new Scanner to read from r. // The split function defaults to ScanLines. funcNewScanner(r io.Reader) *Scanner { return &Scanner{ r: r, split: ScanLines, maxTokenSize: MaxScanTokenSize, } }
// The recover built-in function allows a program to manage behavior of a // panicking goroutine. Executing a calltorecover inside a deferred // function (but notanyfunction called by it) stops the panicking sequence // by restoring normal execution and retrieves the errorvalue passed to the // callof panic. Ifrecoveris called outside the deferredfunction it will // notstop a panicking sequence. In this case, orwhen the goroutine isnot // panicking, orif the argument supplied to panic was nil, recoverreturns // nil. Thus the returnvaluefromrecover reports whether the goroutine is // panicking. func recover() interface{}
1 2 3 4 5 6 7 8 9 10 11 12
functryRecover() { deferfunc() { r := recover() if err, ok := r.(error); ok { fmt.Println("错误信息: ", err) } else { panic(r) } }()
panic(errors.New("这是一个 error")) }
从上面我们可以看到 recover 是一个interface, 所以在判断的时候需要判断 r 是否是一个 error,结果自然会是输出
1
错误信息: 这是一个 error
那我们再用一个实际一点的例子来测试一下,比如除数为0的例子
1 2 3 4 5 6 7 8 9 10 11 12 13 14
functryRecover() { deferfunc() { r := recover() if err, ok := r.(error); ok { fmt.Println("错误信息: ", err) } else { panic(r) } }()
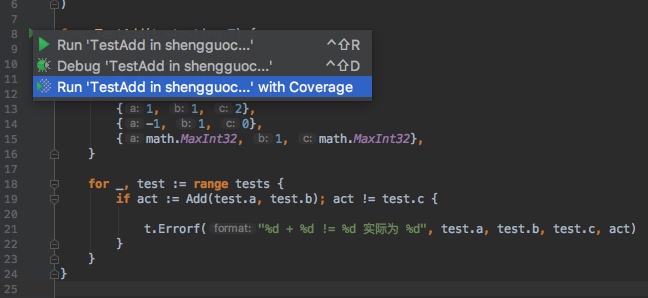
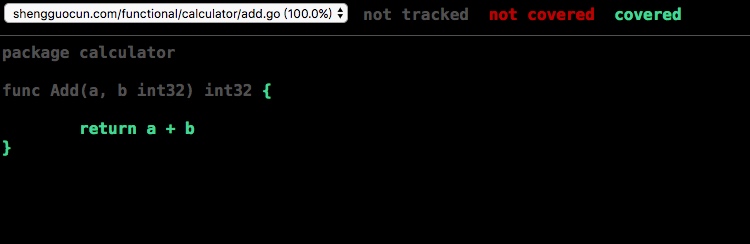
上面就是一段性能测试代码,我们不需要关注这段代码具体要跑多少次,Go语言自身会帮你决定,IDE点击 Run Test 完,输出相关的结果
1 2 3 4 5 6 7
goos: darwin goarch: amd64 pkg: shengguocun.com/functional/calculator 20000000000.35 ns/op PASS
Process finished with exit code 0
总共跑了多少次以及每次的平均耗时,都会给出结果。当然同样支持命令行的交互方式
1 2 3 4 5 6 7
sheng$ go test -bench . goos: darwin goarch: amd64 pkg: shengguocun.com/functional/calculator BenchmarkAdd-420000000000.34 ns/op PASS ok shengguocun.com/functional/calculator 0.721s
sheng$ go test -bench . -cpuprofile=cpu.out goos: darwin goarch: amd64 pkg: shengguocun.com/functional/calculator BenchmarkAdd-420000000000.34 ns/op PASS ok shengguocun.com/functional/calculator 0.916s
这时候我们发现现在多了一个 cpu.out 文件
1 2
sheng$ ls a.out add.go add_test.go calculator.test cpu.out
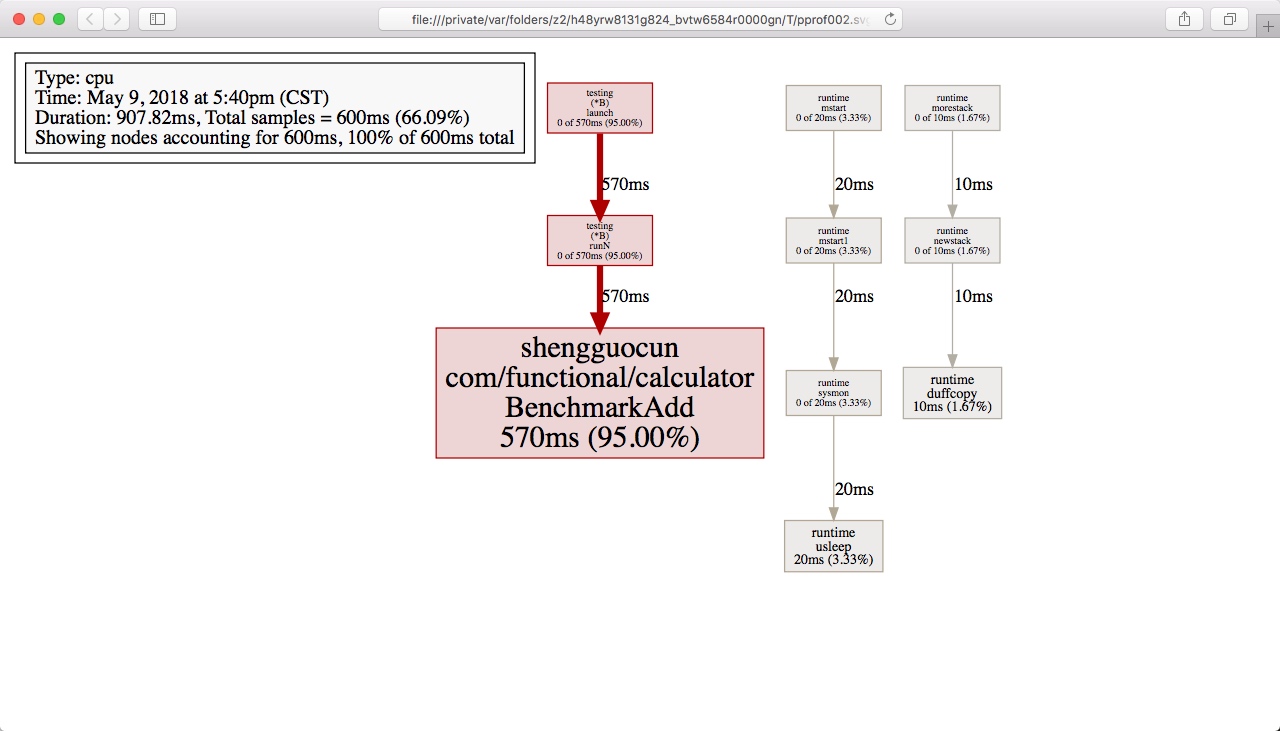
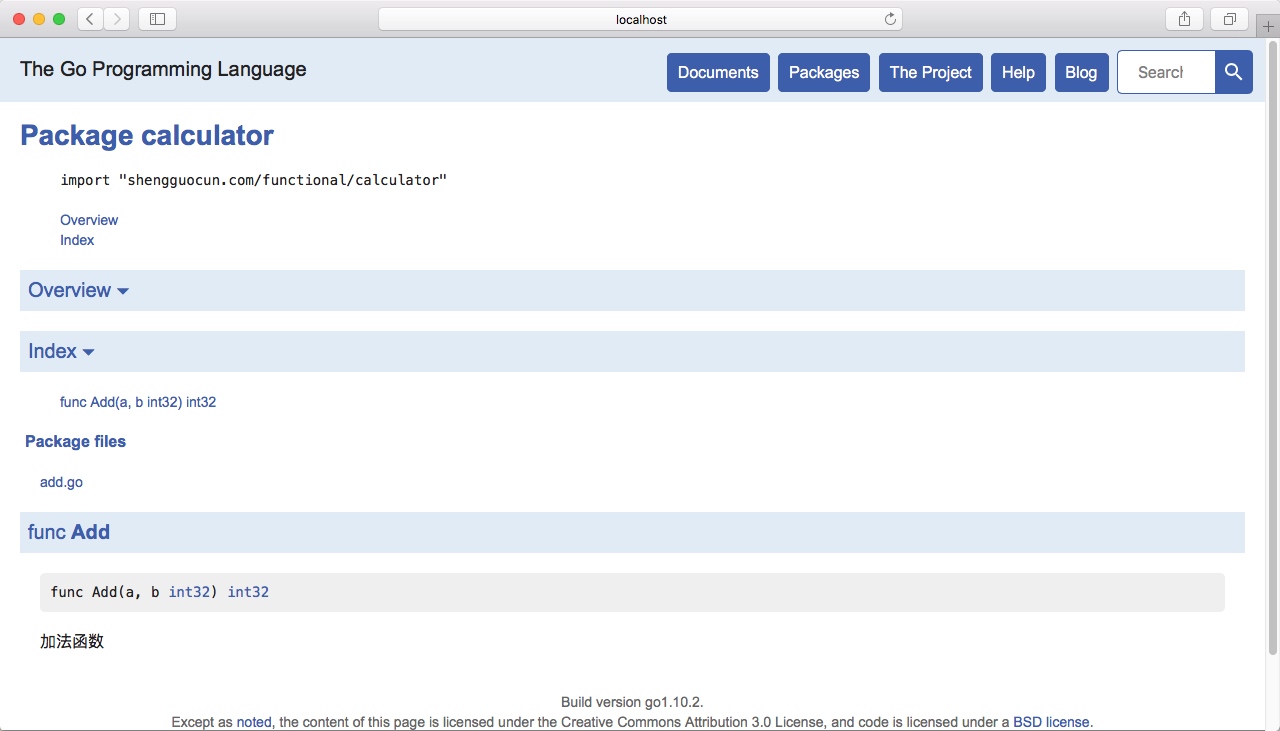
查看之后你会发现是一个二进制文件,那我们该如何处理呢?Go语言的 pprof 就要登场了
1 2
sheng$ less cpu.out "cpu.out" may be a binary file. See it anyway?
1 2 3 4 5 6 7
sheng$ go tool pprof cpu.out Main binary filename not available. Type: cpu Time: May 9, 2018 at 5:40pm (CST) Duration: 907.82ms, Total samples = 600ms (66.09%) Entering interactive mode (type "help"for commands, "o"for options) (pprof)
(pprof) help Commands: callgrind Outputs a graph in callgrind format comments Output all profile comments disasm Outputassembly listings annotated with samples dot Outputs a graph in DOT format eog Visualize graph through eog evince Visualize graph through evince gif Outputs a graph image in GIF format gv Visualize graph through gv kcachegrind Visualize report in KCachegrind listOutput annotated sourcefor functions matching regexp pdf Outputs a graph in PDF format peek Output callers/callees of functions matching regexp png Outputs a graph image in PNG format proto Outputs the profile in compressed protobuf format ps Outputs a graph in PS format raw Outputs a text representation of the raw profile svg Outputs a graph in SVG format tags Outputs all tags in the profile text Outputs top entries intextform top Outputs top entries intextform topproto Outputs top entries in compressed protobuf format traces Outputs all profile samples intextform tree Outputs a text rendering ofcall graph web Visualize graph through web browser weblist Display annotated sourcein a web browser o/options List options and their currentvalues quit/exit/^D Exit pprof
Options: call_tree Create a context-sensitive call tree compact_labels Show minimal headers divide_by Ratio to divide all samples before visualization drop_negative Ignore negative differences edgefraction Hide edges below <f>*total focus Restricts to samples going through a node matching regexp hide Skips nodes matching regexp ignore Skips paths going throughany nodes matching regexp mean Average samplevalueoverfirstvalue (count) nodecount Maxnumberof nodes toshow nodefraction Hide nodes below <f>*total normalize Scales profile based on the base profile. outputOutput filename forfile-based outputs positive_percentages Ignore negative samples when computing percentages prune_from Drops any functions below the matched frame. relative_percentages Show percentages relativeto focused subgraph sample_index Samplevalueto report (0-based indexorname) showOnlyshow nodes matching regexp source_path Searchpathforsource files tagfocus Restricts to samples with tags inrangeormatchedby regexp taghide Skip tags matching this regexp tagignore Discard samples with tags inrangeormatchedby regexp tagshow Onlyconsider tags matching this regexp trim Honor nodefraction/edgefraction/nodecount defaults unit Measurement units to display
Optiongroups (onlyset one per group): cumulative cum Sort entries based on cumulative weight flat Sort entries based on own weight granularity addresses Aggregateat the function level. addressnoinlines Aggregateat the functionlevel, including functions' addresses in the output. files Aggregate at the file level. functions Aggregate at the function level. lines Aggregate at the source code line level. noinlines Aggregate at the function level. : Clear focus/ignore/hide/tagfocus/tagignore type "help <cmd|option>" for more information (pprof)
我们这里就介绍一个最简单的方式,敲入web回车,z这里做一个温馨提示
1 2
(pprof) web Failed to execute dot. Is Graphviz installed? Error: exec: "dot": executable file not found in $PATH
sheng$ go help doc usage: go doc [-u] [-c] [package|[package.]symbol[.methodOrField]]
Doc prints the documentation comments associated with the item identified by its arguments (a package, const, func, type, var, method, or struct field) followed by a one-line summary of each of the first-level items "under" that item (package-level declarations for a package, methods for a type, etc.).
Doc accepts zero, one, or two arguments.
Given no arguments, that is, when run as
go doc
it prints the package documentation for the packagein the current directory. If the packageis a command (package main), the exported symbols of the package are elided from the presentation unless the -cmd flag is provided.
When run with one argument, the argument is treated as a Go-syntax-like representation of the item to be documented. What the argument selects depends on what is installed in GOROOT and GOPATH, as well as the form of the argument, which is schematically one of these:
go doc <pkg> go doc <sym>[.<methodOrField>] go doc [<pkg>.]<sym>[.<methodOrField>] go doc [<pkg>.][<sym>.]<methodOrField>
The first item in this list matched by the argument is the one whose documentation is printed. (See the examples below.) However, if the argument starts with a capital letter it is assumed to identify a symbol or method in the current directory.
For packages, the order of scanning is determined lexically in breadth-first order. That is, the package presented is the one that matches the search andis nearest the root and lexically first at its level of the hierarchy. The GOROOT tree is always scanned in its entirety before GOPATH.
If there is no package specified or matched, the packagein the current directory is selected, so "go doc Foo" shows the documentation for symbol Foo in the current package.
The package path must be either a qualified path or a proper suffix of a path. The go tool's usual package mechanism does not apply: package path elements like . and ... are not implemented by go doc.
When run with two arguments, the first must be a full package path (not just a suffix), and the second is a symbol, or symbol with method or struct field. This is similar to the syntax accepted by godoc:
go doc <pkg> <sym>[.<methodOrField>]
Inall forms, when matching symbols, lower-case letters in the argument match either case but upper-case letters match exactly. This means that there may be multiple matches of a lower-case argument in a packageif different symbols have different cases. If this occurs, documentation forall matches is printed.
Examples: go doc Show documentation for current package. go doc Foo Show documentation for Foo in the current package. (Foo starts with a capital letter so it cannot match a package path.) go doc encoding/json Show documentation for the encoding/json package. go doc json Shorthand for encoding/json. go doc json.Number (or go doc json.number) Show documentation and method summary for json.Number. go doc json.Number.Int64 (or go doc json.number.int64) Show documentation for json.Number's Int64 method. go doc cmd/doc Show package docs for the doc command. go doc -cmd cmd/doc Show package docs and exported symbols within the doc command. go doc template.new Show documentation for html/template'sNewfunction. (html/template is lexically before text/template) go doc text/template.new # One argument Show documentation fortext/template'sNewfunction. go doc text/template new # Two arguments Show documentation fortext/template'sNewfunction.
At least in the current tree, these invocations all print the documentation for json.Decoder's Decode method:
go doc json.Decoder.Decode go doc json.decoder.decode go doc json.decode cd go/src/encoding/json; go doc decode
Flags: -c Respect casewhen matching symbols. -cmd Treat a command (package main) like a regular package. Otherwise package main's exported symbols are hidden when showing the package's top-level documentation. -u Show documentation for unexported as well as exported symbols, methods, and fields.
再比如我们可以查看系统的文档
1 2 3 4 5 6 7 8 9 10 11 12 13
sheng$ go doc json.Decoder.Decode func (dec *Decoder) Decode(v interface{}) error Decode reads the next JSON-encoded value fromits input and stores itinthe value pointed toby v.
See the documentation for Unmarshal for details aboutthe conversion of JSON into a Go value.
sheng$ go doc fmt.Printf func Printf(format string, a ...interface{}) (n int, err error) Printf formats according to a format specifier and writes to standard output. It returns thenumberof bytes written and any writeerror encountered.
sheng$ godoc -help usage: godoc package [name ...] godoc -http=:6060 -analysis string comma-separated list of analyses to perform (supported: type, pointer). See http://golang.org/lib/godoc/analysis/help.html -ex show examples incommandlinemode -goroot string Go root directory (default "/usr/local/Cellar/go/1.10.2/libexec") -html print HTML incommand-line mode -httpstring HTTP service address (e.g., ':6060') -httptest.serve string if non-empty, httptest.NewServer serves onthisaddressandblocks -index enable search index -index_files string glob pattern specifying index files; ifnotempty, the index is readfrom these filesin sorted order -index_interval duration interval of indexing; 0for default (5m), negative to only index once at startup -index_throttle float index throttle value; 0.0 = no time allocated, 1.0 = full throttle (default 0.75) -links link identifiers to their declarations (default true) -maxresults int maximum numberof full text search results shown (default 10000) -notes string regular expression matching note markers to show (default "BUG") -play enable playground in web interface -q arguments are considered search queries -server string webserver address forcommandlinesearches -src print (exported) source incommand-line mode -tabwidth int tab width (default 4) -templates string load templates/JS/CSS from disk in this directory -timestamps show timestamps withdirectory listings -url string print HTML for named URL -v verbose mode -write_index write index toafile; thefile name must be specified with -index_files -zip string zip file providing thefilesystemto serve; disabled ifempty
for i := 0; i < 10; i ++ { func(i int){ for { fmt.Println("Goroutine :" , i) } }(i) } }
上面这段代码有问题么? 这就是一个从 0 到 10 的调用,但是匿名函数内部没有中止条件,所以会进入一个死循环。要是我们在匿名函数前加上 go 关键字,就不是刚才的意思了,就变成并发执行这个函数。主程序继续向下跑,同时并发开了一个函数,就相当于开了一个线程,当然我们后面会继续介绍,这个叫 协程
1 2 3 4 5 6 7 8 9 10 11 12 13 14
package main
import"fmt"
funcmain() {
for i := 0; i < 10; i ++ { gofunc(i int){ for { fmt.Println("Goroutine :" , i) } }(i) } }
我们再执行这段代码,发现什么都没有输出,这又是为什么呢?因为这个 main 和 fmt.Println 是并发执行的,我们还来不及print结果, main 就执行完成退出了。Go语言一旦main函数退出了,所有的Goroutine就被杀掉了。 当然要是想看到输出结果,main函数可以在最后sleep一下
1 2 3 4 5 6 7 8 9 10 11 12 13 14 15 16 17 18
package main
import ( "fmt" "time" )
funcmain() {
for i := 0; i < 10; i ++ { gofunc(i int){ for { fmt.Println("Goroutine :" , i) } }(i) } time.Sleep(time.Millisecond) }
var a [10]int for i := 0; i < 10; i ++ { gofunc(){ for { a[i] ++ runtime.Gosched() } }() } time.Sleep(time.Millisecond) fmt.Println(a) }
运行之后会出现什么问题呢?
1 2 3 4 5 6 7 8 9
panic: runtime error: index out of range
goroutine 6 [running]: main.main.func1(0xc42001a0f0, 0xc42001c060) /Users/verton/GoLangProject/src/shengguocun.com/goroutine/route.go:15 +0x45 created by main.main /Users/verton/GoLangProject/src/shengguocun.com/goroutine/route.go:13 +0x95
Process finished with exit code 2
这里我们通过Go语言的 go run -race xxx.go ,执行分析一下
1 2 3 4 5 6 7 8 9 10 11 12 13 14 15
sheng$ go run -race route.go ================== WARNING: DATA RACE Read at 0x00c420092008 by goroutine 6: main.main.func1() /Users/verton/GoLangProject/src/shengguocun.com/goroutine/route.go:15 +0x54
Previous write at 0x00c420092008 by main goroutine: main.main() /Users/verton/GoLangProject/src/shengguocun.com/goroutine/route.go:12 +0x11b
Goroutine 6 (running) created at: main.main() /Users/verton/GoLangProject/src/shengguocun.com/goroutine/route.go:13 +0xf1 ==================
这个地址 0x00c420092008 是谁呢,很显然就是 i ,原因是因为在最后跳出来的时候 i 会变成10,里面的 a[i] ++ 就会是a[10] ,所以出错的原因就在这。
1 2 3 4 5 6 7 8 9 10 11 12 13 14 15
sheng$ go run -race route.go ================== WARNING: DATA RACE Read at 0x00c420092008 by goroutine 6: main.main.func1() /Users/verton/GoLangProject/src/shengguocun.com/goroutine/route.go:15 +0x54
Previous write at 0x00c420092008 by main goroutine: main.main() /Users/verton/GoLangProject/src/shengguocun.com/goroutine/route.go:12 +0x11b
Goroutine 6 (running) created at: main.main() /Users/verton/GoLangProject/src/shengguocun.com/goroutine/route.go:13 +0xf1 ==================
上面还剩一个的两个Goroutine读写的问题需要我们后面介绍的Channel来解决。
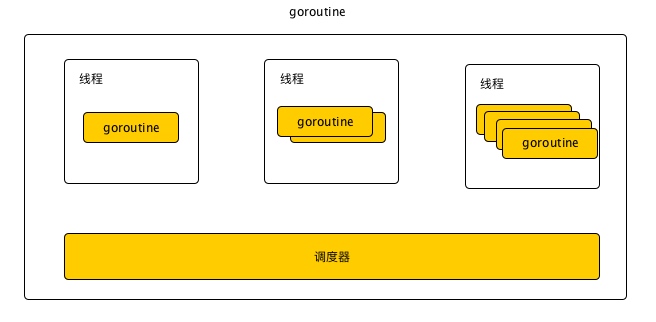
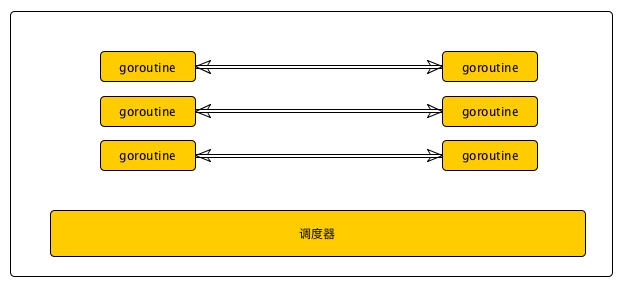
8.1、Go语言调度器
多个协程可能在一个或多个线程上运行
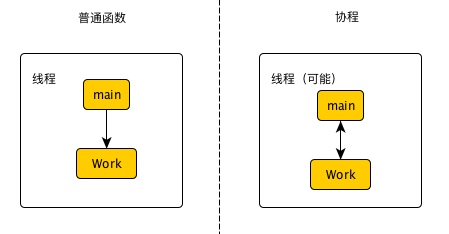
首先我们先看一张普通函数和协程的对比图
普通函数main函数和work函数都运行在一个线程里面,main函数在等work函数执行完才能执行其他的操作。可以看到普通函数 main 函数和 work 函数是单向的,但是发现协程的 main 和 work 是双向通道的,控制权可以在work也可以在main,不需要像普通函数那样等work函数执行完才交出控制权。协程中main和work可能执行在一个线程中,有可能执行在多个线程中。
i := 0 for { time.Sleep(time.Millisecond * time.Duration(rand.Intn(1000))) out <- i i ++ } }() return out }
funcmain() {
var ch1, ch2 = genChan(), genChan() for { select { case data := <- ch1: fmt.Println("CH1 的数据:", data) case data := <-ch2: fmt.Println("CH2 的数据:", data) } } }
// After waits for the duration to elapse and then sends the current time // on the returned channel. // It is equivalent to NewTimer(d).C. // The underlying Timer is not recovered by the garbage collector // until the timer fires. If efficiency is a concern, use NewTimer // instead and call Timer.Stop if the timer is no longer needed. funcAfter(d Duration) <-chanTime { return NewTimer(d).C }
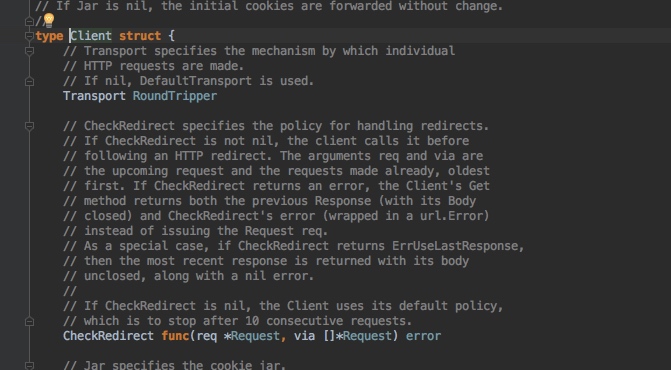
// Transport specifies the mechanism by which individual // HTTP requests are made. // If nil, DefaultTransport is used. Transport RoundTripper
主要用于代理
1 2 3 4 5 6 7 8 9 10
// Jar specifies the cookie jar. // // The Jar is used to insert relevant cookies into every // outbound Request andisupdatedwith the cookie values // of every inbound Response. The Jar is consulted for every // redirect that the Client follows. // // If Jar is nil, cookies areonly sent if they are explicitly // seton the Request. Jar CookieJar
主要用于模拟登录用的
1 2 3 4 5 6 7 8 9 10 11 12 13 14 15 16 17 18
// Timeout specifies a time limit for requests made by this // Client. The timeout includes connection time, any // redirects, and reading the response body. The timer remains // running after Get, Head, Post, or Do return and will // interrupt reading of the Response.Body. // // A Timeout of zero means no timeout. // // The Client cancels requests to the underlying Transport // using the Request.Cancel mechanism. Requests passed // to Client.Do may still set Request.Cancel; both will // cancel the request. // // For compatibility, the Client will also use the deprecated // CancelRequest method on Transport if found. New // RoundTripper implementations should use Request.Cancel // instead of implementing CancelRequest. Timeout time.Duration