0、前言

香草/Vanilla是一个基于Openresty实现的高性能Web应用开发框架.

Vanilla

邮件列表

推荐始终使用最新版的Vanilla

当前Vanilla最新版本0.1.0.rc6,支持命令:

  • vanilla-0.1.0.rc6(你没看错,自0.1.0.rc5起,vanilla的命令行和框架代码都带着版本号,方便多版本共存,也方便框架升级
  • v-console-0.1.0.rc6

特性

  • 提供很多优良组件诸如:bootstrap、 router、 controllers、 models、 views。
  • 强劲的插件体系。
  • 多 Application 部署。
  • 多版本框架共存,支持便捷的框架升级。
  • 一键 nginx 配置、 应用部署。
  • 便捷的服务批量管理。
  • 你只需关注自身业务逻辑。

0.1、安装

1
$ ./setup-framework -v $VANILLA_PROJ_ROOT -o $OPENRESTY_ROOT        #运行 ./setup-framework -h 查看更多参数细节

0.2、快速开始

部署你的第一个Vanilla Application

1
$ ./setup-vanilal-demoapp  [-a $VANILLA_APP_ROOT -u $VANILLA_APP_USER -g $VANILLA_APP_GROUP -e $VANILLA_RUNNING_ENV]    #运行 ./setup-vanilal-demoapp -h 查看更多参数细节

启动你的 Vanilla 服务

1
$ ./$VANILLA_APP_ROOT/va-appname-service start

社区组织

QQ群&&微信公众号

  • Openresty/Vanilla 开发 1 群:205773855
  • Openresty/Vanilla 开发 2 群:419191655
  • Openresty 技术交流 1 群:34782325
  • Openresty 技术交流 2 群:481213820
  • Openresty 技术交流 3 群:124613000
  • Vanilla开发微信公众号:Vanilla-OpenResty(Vanilla相关资讯、文档推送)

1、快速上手

1.1、Hello World

1.1.1、Vanilla 的安装

安装准备

  1. 安装好 OpenResty
  2. Vanilla Github 地址:https://github.com/idevz/vanilla

安装

1
2
3
4
5
6
7
8
9
# 1.git clone 最新 Vanilla 版本(或者下载相应的 Vanilla release 版本)
git clone https://github.com/idevz/vanilla.git

# 2. 切换到 Vanilla 文件夹
cd vanilla

# 3.编译 vanilla: ./setup-framework -v $VANILLA_PROJ_ROOT -o $OPENRESTY_ROOT 其中 $VANILLA_PROJ_ROOT 为 vanilla 框架安装目录。 -o 为 openresty 安装目录

./setup-framework -v /application/vanilla -o /application/openresty

经过这 3 步如果没有报错,则安装 vanilla 成功

创建 vanilla 项目

1
2
3
4
5
6
7
8
9
10
11
12
13
14
15
16
17
18
19
20
21
22
23
24
25
26
27
28
29
30
31
#1. 创建 vanilla 的运行用户

useradd -s /sbin/nologin -M nginx

id nginx # 可以查看到创建的用户

# 2、创建 vanilla 项目, -a 为 项目路径,-u 为执行用户 -g 为用户组 (在根目录 /home/webserver 下创建名为 cms 的项目)

./setup-vanilla-demoapp -a /home/webserver/cms -u nginx -g nginx

# 3、删掉默认 Nginx 服务

pkill -9 nginx

# 4、切换到项目文件夹 编辑项目配置文件,改成你要的

cd /home/webserver/cms
cd nginx_conf
vim va-nginx.conf
vim va-nginx-development.conf

# 5、同步配置文件到运行目录

./va-cms-service initconf dev -f #开发模式
./va-cms-service initconf -f #生产模式


# 6、启动项目(2选1)

./va-cms-service start dev # 启动开发模式
./va-cms-service start # 启动生产模式

服务启动后,开发环境默认启动在 9110 端口,http://localhost:9110 即可访问

vanilla 常用命令

  1. 启动项目: ./va-cms-service start 或者 ./va-orcms-service start dev

  2. 重启项目 ./va-cms-service restart 或者 ./va-orcms-service restart dev

  3. 停止项目: ./va-cms-service stop 或者 ./va-orcms-service stop dev

  4. 创建配置文件 ./va-cms-service initconf dev -f

1.2、如何调试

1.2.1、Vanilla 的 调试

除了查看 nginx 错误日志辅助开发外,为了方便 Vanilla 项目的开发和调试,Vanilla 提供了诸如 print_r 之类的对象输出方法,以及详细友好的页面报错输出,你不需要到服务器日志去查看,就能所见即所得的开发调试代码.

sprint_r,print_r,lprint_r,err_log

  • sprint_r

将 LUA 对象等格式化为易读的字符串返回

  • print_r

类似 ngx.say 的效果,将对象、变量等以易读的格式进行输出,适用于 Vanilla 开发的 Web 服务

  • lprint_r

print_r 的 CLI 版本,适用于 v-console 命令行环境

1
2
3
4
5
6
7
8
9
10
11
╰─○ v-console-0.1.0.rc6
Lua 5.1.4 Copyright (C) 1994-2008 Lua.org, PUC-Rio
v-console>a={}
v-console>a.v1='a_v1'
v-console>a.v2='a_v2'
v-console>lprint_r(a)
{
v2 = "a_v2",
v1 = "a_v1"
}
v-console>
  • err_log

err_log 方法是对 ngx.ERR 的封装,将 msg 记录到 nginx 错误日志

1.3、如何新增一个Controller

1.3.1、Vanilla 的 controller

vanilla 的 controller 是业务处理的关键,vanilla 通过对 URI 的路由,找到本次请求对应的 controller 和 action。

  • 最简单的 Controller

自动生成的 demo 中默认生成了 IndexController 和 index action(function IndexController:index()),默认使用简单路由协议(vanilla.v.routes.simple)对 URI 进行路由

1
2
3
4
5
6
7
8
9
10
11
12
13
14
15
16
17
18
19
local IndexController = {}

-- curl http://localhost:9110
function IndexController:index()
local view = self:getView()
local p = {}
p['vanilla'] = 'Welcome To Vanilla...' .. user_service:get()
p['zhoujing'] = 'Power by Openresty'
-- view:assign(p)
do return view:render('index/index.html', p) end
return view:display()
end

-- curl http://localhost:9110/index/action_b
function IndexController:action_b()
return 'index->action_b'
end

return IndexController

以上代码解释

关于上面的 controller 实例代码,我们只需关注下面几点

  • IndexController:index (index Controller 中的 index Action),通过 self:getView() 方法获取视图实例
  • 可以通过先调用 view:assign(p) 将所需要的参数传入视图,再调用 view:display() 进行模板渲染,或者可以直接调用 view:render('index/index.html', p) 方法,指定需要渲染的模板,并同时传入相应的参数
  • 模板参数都是与 LUA 数组的形式进行传递
  • 每个 action 的返回值都必须是字符串,所以可以知道 view:display()view:render() 方法都是返回字符串
  • IndexController:action_b (index Controller 中的 action_b Action,这里注意,action 的方法名必须小写),使用默认的简单路由协议,访问 URI 为 curl http://localhost:9110/index/action_b

注:目前 vanilla 所默认使用的模板引擎是 appo 老师开发的 resty-template,模板详细的使用文档请移步 appo 老师处参阅。

1.3.2、新添加一个 Controller

给 Vanilla 添加一个新的 Controller 非常简单,只需要在项目的 controllers 目录,实现一个 LUA 包,包导入的函数即为各个 action, 文件名与 controller 同名。例如添加一个名为 idevz 的 controller, 且实现一个名为 dohello 的 action()。

1
2
3
4
5
6
local IdevzController = {}
-- curl http://localhost:9110/idevz/dohello
function IdevzController:dohello()
return 'do-hello-action.'
end
return IdevzController

1.4、如何使用Models/Dao

1.4.1、Vanilla 的 DAO

vanilla 的 DAO 预设为项目对数据源的封装,一切对数据源的操作都可以封装成 DAO,方便维护、管理、缓存等。 Vanilla 的 DAO 在项目的 models/dao 路径下,一般使用 LoadModel 方法进行加载

最简单的 DAO

由自动生成的 demo 中默认生成了 TableDao,可以看出 TableDao 只是一个普通的 LUA 包。

1
2
3
4
5
6
7
8
9
10
11
12
13
14
15
16
17
18
19
20
21
local TableDao = {}

function TableDao:set(key, value)
self.__cache[key] = value
return true
end

function TableDao:new()
local instance = {
set = self.set,
__cache = {}
}
setmetatable(instance, TableDao)
return instance
end

function TableDao:__index(key)
local out = rawget(rawget(self, '__cache'), key)
if out then return out else return false end
end
return TableDao

以上代码解释

DAO 可以是任何对数据层访问封装的 LUA 包,实现方式非常自由。

1.5、如何使用Models/Service

1.5.1、Vanilla 的 Service

vanilla 的 Service 预设为项目对某些通用业务逻辑封装为独立的 Service,方便维护、管理、缓存等。 Vanilla 的 Service 在项目的 models/service 路径下,一般使用 LoadModel 方法进行加载

最简单的 Service

由自动生成的 demo 中默认生成了 UserService,可以看出 UserService 也只是一个普通的 LUA 包。不过 Service 一般调用更底层的 DAO ,并对之做必要封装,并将相关的 Service 暴露给 Controller 使用

1
2
3
4
5
6
7
8
9
local table_dao = LoadApplication('models.dao.table'):new()
local UserService = {}

function UserService:get()
table_dao:set('zhou', 'UserService res')
return table_dao.zhou
end

return UserService

以上代码解释

Service 可以是任何对数据层访问封装的 LUA 包

2、APIs

2.1、配置

香草/Vanilla的配置由以下三个部分组成.

  • App配置
  • Nginx配置
  • WAF配置

2.1.1、App配置

应用基础配置(config/application.lua)

1
2
3
4
5
6
7
8
9
10
11
12
13
14
15
16
17
Appconf.sysconf = {				--系统预加载配置文件
'v_resource',
}
Appconf.name = 'app_name' --app名称,执行vanilla new命令时给定的应用名

Appconf.route='vanilla.v.routes.simple' --路由器,指定URL路由方式,目的解析出需要执行的controller与action
Appconf.bootstrap='application.bootstrap' --初始化bootstrap(用来对应用进行初始化操作)
Appconf.app={} --app相关配置
Appconf.app.root='./' --当前vanilla start命令执行路径

Appconf.controller={} --当前app的controller相关配置
Appconf.controller.path=Appconf.app.root .. 'application/controllers/' --controller文件所在路径(使用默认生成路径即可)

Appconf.view={} --当前app的视图层相关配置
Appconf.view.path=Appconf.app.root .. 'application/views/' --模板路径
Appconf.view.suffix='.html' --模板后缀
Appconf.view.auto_render=true --是否开启自动渲染

应用基础配置的引用

1
2
-- 如上的配置,可以在代码中通过 Registry['APP_CONF'] 表来进行获取,比如获取 APP_NAME
local app_name = Registry['APP_CONF']['name']

错误处理配置(config/errors.lua)

根据errors.lua文件中实例,配置用户级别错误码.

1
2
3
local Errors = {
[1000] = { status = 500, message = "Controller Err." },
}

Restful 路由协议配置(config/restful.lua)

根据 URI 需要来自定义路由协议的配置

1
2
3
4
5
6
7
8
9
10
11
12
13
14
15
16
17
18
19
local restful = {
v1={},
v={}
}

restful.v.GET = {
{pattern = '/', controller = 'index', action = 'index'},
{pattern = '/:category', controller = 'index', action = 'list'}
}

restful.v.POST = {
{pattern = '/post', controller = 'index', action = 'post'},
}

restful.v1.GET = {
{pattern = '/api', controller = 'index', action = 'api_get'},
}

return restful

系统相关配置(sys/*)

比如DB、MC等资源配置,系统相关的分机房配置等(在某些大公司,这部分配置又运维人员统一管理和下发),文件格式目前使用相对更运维友好的 ini 文件,开发中可以方便的在 Registry[‘sys_conf’] 中获取相关数据,如 Registry['sys_conf']['cache']['lrucache'] 获取 lrucache 相关配置

系统缓存相关配置 (sys/cache)

1
2
3
4
5
6
7
8
9
10
11
12
13
14
15
16
17
18
19
20
21
22
[shared_dict]
dict=idevz
exptime=100

[memcached]
instances=127.0.0.1:11211 127.0.0.1:11211
exptime=60
timeout=100
poolsize=100
idletimeout=10000

[redis]
instances=127.0.0.1:6379 127.0.0.1:6379
exptime=60
timeout=100
poolsize=100
idletimeout=10000

[lrucache]
items=200
exptime=60
useffi=false
  • 目前这部分配置一般由 vanilla.v.libs.cache 来使用
  • 目前支持的配置项如 poolsize(连接池大小)、timeout(数据获取超时等)

系统缓存相关配置 (sys/v_resource)

1
2
3
4
5
6
7
8
9
10
11
12
13
14
15
16
17
18
19
20
21
22
[mc]
conf=127.0.0.1:7348 127.0.0.1:11211

[redis]
conf=127.0.0.1:7348 127.0.0.1:7349

[redisq]
conf=127.0.0.1:7348 127.0.0.1:7349

[db.user.write]
host =127.0.0.1
port =3306
dbname =user.info
user =idevz
passwd =idevz

[db.user.read]
host =127.0.0.1
port =3306
dbname =user.info
user =idevz
passwd =idevz
  • 对所使用的数据资源做配置
  • Registry['sys_conf']['v_resource)']['db.user.write']['host'] 获取写库的 HOST 信息

2.1.2、Nginx配置

自动生成的 Nginx 配置文件

初始化项目的时候会在项目目录下(nginx_conf/)自动生成这个项目所对应的两套(分别对应开发和线上环境)配置文件,生成的两套配置文件中,每套都包含 nginx.conf 和 vhost 两个配置文件

  • 生产环境

va-nginx.conf 文件

va-nginx.conf 配置文件内容包含 nginx 配置主干(main、events、http 等重点配置段),包括用户、组的配置,工作进程等等通用配置,关键的还有 lua_package_pathlua_package_cpath 的配置,还有框架初始化文件(vanilla/framework/init.lua)的加载

vhost/app_name.conf 文件

vhost/app_name.conf 文件是当前应用的相关配置,包括 APP_NAME、VANILLA_VERSION、$template_root、$va_cache_status 等全局变量的初始化,$document_root,Server_name 等的设置,还有关键的应用入口(content_by_lua_file),lua_shared_dict 等的设置,不过这些设置都是自动生成的,开发人员没有特殊需求的话,并不需要关注这些

  • 开发环境

va-nginx-development.conf 文件

va-nginx-development.conf 文件的内容跟开发环境类似,唯一的区别在于加载框架初始化文件(vanilla/framework/init.lua)的方式为 init_by_lua_file

dev_vhost/app_name.conf 文件

默认的dev_vhost/app_name.conf 文件的配置同生产环境的配置基本一样,关键不同在于 lua_code_cache 的设置

注:所以初始化项目后,首先需要执行 sudo ./va-app_name-service initconf dev 命令,就是为了将自动生成的配置文件部署到 OpenResty 默认的配置文件路径下,如果需要更新 va-nginx(-development).conf 则还需要在命令后面加上 -f 参数进行强行部署,每次如果需要修改配置,也只需修改这部分配置,然后执行 initconf 即可

nginx.lua( vanilla-0.1.0.rc5 后废弃此配置 )

分为ngx_conf.common和ngx_conf.env两个部分,common是对Openresty指令集的配置如INIT_BY_LUA,可以是包或者文件(BY_LUA_FILE),env是环境的部分,包括了开发环境,测试环境和生产环境端口和缓存配置等控制.

1
2
3
4
5
6
7
8
9
ngx_conf.common = {
INIT_BY_LUA = 'nginx.init',
CONTENT_BY_LUA_FILE = './pub/index.lua'
}
ngx_conf.env = {}
ngx_conf.env.development = {
LUA_CODE_CACHE = false,
PORT = 7200
}

2.1.3、WAF配置

waf.lua

包括WAF规则的配置,及各种规则参数的配置,相关使用方法详见 waf

2.2、Bootstrap

2.2.1、使用 Bootstrap 来做服务初始化

Vanilla 使用 Bootstrap 来做应用初始化的工作,用户可以在此对应用做一些配置(比如所使用的路由协议,使用何种视图引擎),对配置做一些初始化加载,初始化 WAF,初始化 Plugins 等操作,Vanilla 运行在 OpenResty content_by_lua\这个 Phrase,使用 Bootstrap 可以很好的实现对请求的细粒度控制*

Bootstrap 即类 application.bootstrap

Bootstrap 的实现其实是一个名为 application.bootstrap 的 Vanilla 类,实现了构造器初始化的属性只有一个(当前请求所使用的 dispatcher),我们只需要关注根据需求实现各种 init 方法即可,最后只要在 boot_list 方法返回的列表中的 init 方法都会被顺序执行

1
2
3
4
5
6
7
8
9
10
11
12
13
function Bootstrap:boot_list()
return {
-- Bootstrap.initWaf,
-- Bootstrap.initErrorHandle,
Bootstrap.initRoute,
-- Bootstrap.initView,
-- Bootstrap.initPlugin,
}
end

function Bootstrap:__construct(dispatcher)
self.dispatcher = dispatcher
end

上面的定义代表只有 initRoute 方法会被执行,而上面两个方法的实现我们并不需要关心和更改,只需要定义各种 init 方法,并更新 boot_list 返回的表元素即可,比如下面初始化路由协议的 initRoute

1
2
3
4
5
function Bootstrap:initRoute()
local router = self.dispatcher:getRouter()
local restful_route = restful:new(self.dispatcher:getRequest())
router:addRoute(restful_route, true)
end

注:可以通过 self.dispatcher 获取当前请求相关的详细信息,并进行相关控制

2.3、Controllers

2.3.1、Vanilla 的 controller

vanilla 的 controller 是业务处理的关键,基本的用法请参考上文 (如何新增一个Controller) 。

关于 Controller

Vanilla 的 Controller 可以是任何普通的 LUA 包,只不过导入的方法被用作处理请求的 Action。如下示例:

1
2
3
4
5
6
7
8
9
10
11
12
13
14
15
16
17
18
19
local IndexController = {}

-- curl http://localhost:9110
function IndexController:index()
local view = self:getView()
local p = {}
p['vanilla'] = 'Welcome To Vanilla...' .. user_service:get()
p['zhoujing'] = 'Power by Openresty'
-- view:assign(p)
do return view:render('index/index.html', p) end
return view:display()
end

-- curl http://localhost:9110/index/action_b
function IndexController:action_b()
return 'index->action_b'
end

return IndexController

更面向对象的 Controller

Vanilla 支持使用 Class 方法来声明一个 Controller,实例如下:

1
2
3
4
5
6
7
8
local IndexController = Class('controllers.index')

-- curl http://localhost:9110/index/action_b
function IndexController:action_b()
return 'index->action_b'
end

return IndexController

这种情况下,可以定义 Controller 的构造器来对其进行初始化。示例如下:

1
2
3
4
5
6
7
8
9
10
11
12
local IndexController = Class('controllers.index')

function IndexController:__construct()
self.aa = aa({info='ppppp'})
end

-- curl http://localhost:9110/index/action_b
function IndexController:action_b()
return 'index->action_b'
end

return IndexController

甚至还可以声明一个 Controller 基类,处理某些通用的逻辑,相关的详细用法参见 Vanilla面向对象 相关章节。

关于 Action 的返回值

Vanilla 底层会将 Action 执行的结果,完全使用 ngx.print 进行输出,所以 Action 的返回值必须不能为空。而由于 Vanilla 的 Response 中,提供了给响应添加头尾的 Response:appendBodyResponse:prependBody 方法,最终的结果会将这些部分合起来一起返回,所以 Action 的返回值要求如下:

  • Action 返回值必须非空
  • Action 返回值可以为一维索引数组(不可以是多维 Hash 数组)或者字符串

2.4、模板引擎

2.4.1、Vanilla 的视图引擎

为去除模板运行时模板解析带来的不必要开销,从 vanilla-0.1.0.rc7 起 Vanilla 开始支持 OpenResty 官方的 Lemplate 模板引擎,下面将简要介绍 Vanilla 中 Lemplate 的用法,以及 Vanilla View 接口介绍

Vanilla 的视图渲染

Vanilla 在 vanilla.v.dispatcher 中导入了默认的模板引擎(local View = LoadV 'vanilla.v.views.rtpl'),但是可以在 Bootstrap 中实现 initView 来修改所使用的视图引擎。
而 Vanilla 的模板渲染,只需要在相应的 Action 中获取当前视图实例,注入数据,展示即可。下面就以 Lemplate 模板引擎为例,展示相关用法

首先在 Bootstrap 中实现 initView 方法,修改项目所使用的视图引擎

1
2
3
4
5
6
7
8
9
10
11
12
13
14
15
16
-- application/bootstrap.lua
function Bootstrap:initView()
local view = LoadV('vanilla.v.views.lemplate'):new(self.dispatcher.application.config.view)
self.dispatcher:setView(view)
end

-- boot_list 中打开 Bootstrap.initView 方法调用
function Bootstrap:boot_list()
return {
-- Bootstrap.initWaf,
-- Bootstrap.initErrorHandle,
-- Bootstrap.initRoute,
Bootstrap.initView,
-- Bootstrap.initPlugin,
}
end

运行 ./va-{app_name}-service ltpl 命令调用 Lemplate 编译你的 TT2 模板

下面是 TT2 模板示意

1
2
3
4
5
6
7
8
9
10
11
12
13
14
15
16
<!DOCTYPE html>
<html lang="en">
<head>
<meta charset="utf-8">
<title>[% title %]</title>
</head>
<body>
<div>
[% FOREACH userinfo IN userlists %]
<p>
<h6>姓名:[% userinfo.name %] / 地址:[% userinfo.addr %]</h6>
</p>
[% END %]
</div>
</body>
</html>

在 Vanilla Action 中调用编译好的模板

1
2
3
4
5
6
7
8
function IndexController:index()
local view = self:getView()
local users = {
{name='idevz', addr='yunnan'},
{name='vanilla', addr='beijing'},
}
return view:assign({userlists=users, title = 'Vanilla-Lemplate'})
end

注:

  • local view = self:getView() 获取当前视图实例
  • view:assign({userlists=users, title = 'Vanilla-Lemplate'}) 将数据注入视图

注:以上为 Lemplate 所使用的 TT2 模板实例,关于 Lemplate 的详细使用,可参考其详细 文档

2.5、插件

2.5.1、Vanilla 的插件体系

为了减少运行占用的系统资源,使开发更简便,Vanilla 默认只运行在 content_by_lua 这个 phrase,但是为了支持业务开发有层次化的请求控制,Vanilla 实现了便捷的插件机制,提供了六个钩子,给请求的细粒度控制提供了可能。下面我们来看看如何使用

Vanilla Plugin 的简单使用

在 Vanilla 项目中使用插件是非常简单的,只需要在 application/plugins/ 路径下实现 Vanilla 的插件 LUA 包即可,插件包可以按需实现 6 个钩子的方法。默认生成的 demo 项目中自动生成了一个 admin plugin,见 application/plugins/admin.lua。六个钩子方法按需实现,空方法可去掉,如下所示:

1
2
3
4
5
6
7
8
9
10
11
12
local AdminPlugin = LoadV('vanilla.v.plugin'):new()

function AdminPlugin:routerStartup(request, response)
print_r('<pre>')
if request.method == 'GET' then
print_r('-----------' .. sprint_r(request.headers) .. '----------')
else
print_r(request.headers)
end
end

return AdminPlugin

Vanilla Plugin 的调用

Vanilla Plugins 的调用非常简单,只需要在 application/bootstrap.lua 中实现 initPlugin 方法,并调用 dispatcher 的插件注册方法将插件注入项目( self.dispatcher:registerPlugin(admin_plugin)),即能在对应的时机执行相关钩子对应的方法

1
2
3
4
5
6
7
8
9
10
11
12
13
14
15
16
17
18
local Bootstrap = Class('application.bootstrap')

function Bootstrap:initPlugin()
local admin_plugin = LoadPlugin('plugins.admin'):new()
self.dispatcher:registerPlugin(admin_plugin);
end

function Bootstrap:boot_list()
return {
Bootstrap.initPlugin,
}
end

function Bootstrap:__construct(dispatcher)
self.dispatcher = dispatcher
end

return Bootstrap

Vanilla 支持的插件钩子

以下列出 Vanilla 支持的 6 中插件钩子

1
2
3
4
5
6
function Plugin:routerStartup(request, response)			-- 开始路由
function Plugin:routerShutdown(request, response) -- 路由结束
function Plugin:dispatchLoopStartup(request, response) -- 开始请求分发
function Plugin:preDispatch(request, response) -- 预分发(载入相关的 controller)
function Plugin:postDispatch(request, response) -- 请求响应
function Plugin:dispatchLoopShutdown(request, response) -- 请求分发执行结束

2.6、路由

2.6.1、Vanilla 的路由体系

Vanilla 实现的路由体系有一个路由器(vanilla.v.router)和若干路由协议构成(Vanilla 默认实现了 vanilla.v.routes.simplevanilla.v.routes.restful 两种路由协议,默认使用 simple 路由来路由请求),请求处理的开始阶段,Vanilla 通过调用路由器协议栈中的各种路由协议,计算出处理当前请求的 controlleraction,这就是 Vanilla 路由体系的职责所在。如果默认的两种路由协议不能满足你的 URI 路由需求,你可以参考我的一篇《如何给Vanilla(OpenResty)添加一个路由协议》的博文

Vanilla 路由器

Vanilla 的路由器 vanilla.v.router 是请求路由的基础,路由器提供了对路由协议的添加 addRoute(route, only_one),删除 removeRoute(route_name),获取路由列表 getRoutes() 等方法,用户可以调用这些方法来管理路由协议栈并使用路由器,不过用户不需要关心路由器的实现,而只需要关注路由协议的实现。

给路由器添加一条路由协议

路由器只有唯一一个 vanilla.v.router,但路由协议可以有多个,通过 addRoute(route, only_one) 方法的调用可以向路由协议栈添加一条路由协议,第二个参数为可选参数,当设置为 true 时,代表将清空路由协议栈,只使用当前添加的这条路由协议,因为 Vanilla 路由请求的方式是路由器根据路由协议栈中的路由协议挨条解析,直到找到匹配的 controlleraction 为止,太多的路由协议栈可能影响路由性能。

删除一条路由协议

Vanilla 的每条路由协议都有 route_name 属性,删除时只需要调用 removeRoute(route_name)

获取当前所使用的路由协议

Vanilla 支持获取当前请求所使用的路由协议,只需调用 getCurrentRoute() 方法,调用 getCurrentRouteName() 方法可以获取当前路由协议名

路由协议

路由协议非常的简单,因为路由协议的关键功能在于为当前请求找到对应的 controlleraction,核心在于根据当前请求实例 request,通过实现 match 方法,来获取结果,下面是根据 vanilla.v.routes.simple 路由协议提炼出来的路由协议简单骨架:

1
2
3
4
5
6
7
8
9
10
11
12
13
14
15
16
17
18
19
local Simple = {}

function Simple:new(request)
local instance = {
route_name = 'vanilla.v.routes.simple',
request = request
}

setmetatable(instance, {
__index = self,
__tostring = function(self) return self.route_name end
})
return instance
end

function Simple:match()
end

return Simple

注:我们需要关注以下两点

  • route_name 这是路由协议栈索引的关键,协议栈中的路由协议依靠 route_name 进行管理
  • request 是当前请求的实例,包含了当前请求携带的 URI,http_header 等数据,是请求路由的依据

2.7、异常处理

2.7.1、Vanilla 的错误处理

Vanilla 的错误处理分为框架系统错误和应用错误两种类型,系统错误由框架控制,一般导致致命错误,直接抛出 500 内部错误,切不再往下执行,而应用错误则可以通过定义 errorController 来自定义处理

Vanilla 应用错误

Vanilla 提供了方便的错误处理方式,避免当代码运行报错后,页面只显示一个 500 错误的白页,没有详细报错信息,影响开发效率,Vanilla 的应用错误处理非常简单,在业务开发中,我们所关注的各个组件比如 DAO、Service、Controller、Action、Library 等都可能报错,Controller Action 作为 Vanilla 项目处理请求的执行体,一切业务组件的错误都可以通过一个统一的处理口径 errorController 来方便的处理。在业务组件开发过程中的错误,或者用户自定义的错误,都可以在 errorController 中得到捕获和处理,默认初始化的 demo 项目中,application/controllers/ 路径下,默认定义了一个 error.lua 文件,这就是前面所说的 errorController,下面我们具体来看看这段代码:

1
2
3
4
5
6
7
8
9
10
11
12
13
14
15
16
17
18
19
local ErrorController = {}
local ngx_log = ngx.log
local ngx_redirect = ngx.redirect
local os_getenv = os.getenv

function ErrorController:error()
local env = os_getenv('VA_ENV') or 'development'
if env == 'development' then
local view = self:getView()
view:assign(self.err)
return view:display()
else
local helpers = require 'vanilla.v.libs.utils'
ngx_log(ngx.ERR, helpers.sprint_r(self.err))
-- return ngx_redirect("http://sina.cn?vt=4", ngx.HTTP_MOVED_TEMPORARILY)
return helpers.sprint_r(self.err)
end
end
return ErrorController

代码释意:(你只需要关注以下几点,即可随意,按需定义适合你的 errorController)

  • 这是一个普通的 LUA 包,一个普通的 Vanilla Controller,唯一需要注意的一点就是需要实现一个 error 方法,注意方法名小写
  • 可以通过对运行环境的判断来,对不同的运行环境进行不同的错误处理,比如开发环境可能需要直接将错误打印到页面,而生产环境可能需要出错误页面等

Vanilla 框架系统错误(致命错误)

当有些 Vanilla 项目所必须的配置或者关键步骤执行异常而影响项目往下运行的情况下,会抛出致命错误,并结束当前请求,目前有以下几种情况

  • 关键配置缺少

项目未配置项目名 name,或者未指定项目根路径 root,Vanilla 有很多地方依赖项目名,比如缓存的 KEY 设置,项目的各类包加载依赖于项目根路径做全局加载,多 APP 支持也依赖与此。如果 config/application.lua 中缺少这两个配置,则会如下错误:

1
2
3
4
Sys Err: Please set app name and app root in config/application.lua like:

Appconf.name = 'idevz.org'
Appconf.app.root='/data1/VANILLA_ROOT/idevz.org/'
  • bootstrap 报错

Bootstrap 中的各种 init 方法并不是必须的,但是如果这部分方法定义后,执行错误,将影响整体项目的正常运行,所以 application/bootstrap.lua 中的运行报错也会报出系统致命错误,举例如下:

1
2
3
4
5
6
function Bootstrap:initRoute()
local router = self.dispatcher:getRouter()
local restful_route = restful:new(self.dispatcher:getRequest())
router:addRoute(restful_route, true)
print_r('xx' .. false)
end

注:以上代码,最后一行操作试图将字符串与 bool 值 false 连接,会报出致命错误,如下:

1
2
<pre />
"...g/idevz/code/www/vanilla/orcon/application/bootstrap.lua:18: attempt to concatenate a boolean value"
  • dispatch 执行报错

dispatch 属于框架的请求分发操作,请求分发执行出错直接导致致命错误,不过这个错误由框架自己处理,用户不需要关注

2.8、内建类

2.8.1、Vanilla 的內建变量和方法

为方便业务开发,Vanilla 提供了一些比较实用的內建方法和变量,这里我们说明如下,随着框架的更新,本页面会及时更新,欢迎随时关注。

Vanilla 的內建变量

Vanilla 的內建变量很多来自于 nginx.conf,其他则来自于 ngx.var,Vanilla 将这些变量都缓存在了 Registry 中

  • Registry 变量

Registry 是 Vanilla 中为了全局数据共享,及高效数据访问而封装的一个全局表,这里缓存了刻画当前请求比较全的数据,具体列表说明如下:

1
2
3
4
5
6
7
8
9
10
11
12
13
14
15
16
17
18
19
-- 以下数据以 "curl http://domain.org/?arg1=aa1&arg2=aa2" 访问为例进行说明
Registry['APP_CONF'] -- 当前应用的配置数据,来自于(config/application.lua)
Registry['sys_conf'] -- 当前应用的系统配置,来自于(sys/*路径,比如可以使用 Registry['sys_conf']['cache'] 获取 sys/cache 文件中关于 cache 的配置)
Registry['REQ_URI'] -- 当前请求的 URI ,为 "/"
Registry['REQ_ARGS'] -- 当前请求的参数字符串,即 Query_String,为 "arg1=aa1&arg2=aa2"
Registry['REQ_ARGS_ARR'] -- 当前请求的参数列表,为一个 LUA 数组
Registry['REQ_HEADERS'] -- 当前请求的请求头数组
Registry['APP_NAME'] -- 应用名称
Registry['APP_ROOT'] -- 应用所在根目录
Registry['APP_HOST'] -- 当前请求的 HOST 信息
Registry['APP_PORT'] -- 当前请求的 PORT 信息
Registry['VANILLA_ROOT'] -- VANIALLA 框架的根目录
Registry['VANILLA_VERSION'] -- 当前所使用的 VANILLA 版本号
Registry['VANILLA_APPLICATION'] -- 'vanilla.v.application' LUA 包
Registry['VANILLA_UTILS'] -- 'vanilla.v.libs.utils' LUA 包
Registry['VANILLA_CACHE_LIB'] -- 'vanilla.v.cache' LUA 包
Registry['VANILLA_COOKIE_LIB'] -- 'vanilla.v.libs.cookie' LUA 包
Registry['APP_BOOTS'] -- 应用 'application.bootstrap' LUA 包
Registry['APP_PAGE_CACHE_CONF'] -- 应用 Page Cache 相关配置

注:上面很多全局变量是从 ngx.var. 获取来的结果缓存的,这样避免每次都请求 ngx.var 而减少这部分性能开销,并且其中有些信息比如 APP_NAMEAPP_ROOT 等服务一经启动就不会更改,而像 `REQ_相关的数据则是每次请求都不一样,好在一次请求可能对这部分数据会多次调用,所以将其缓存在Registry` 表中*

Vanilla 的內建函数

Vanilla 有很多内建的函数,这些函数有些来自于 Vanilla 框架本身功能性的一些 LUA 包中,比如 vanilla.v.controllervanilla.v.requestvanilla.v.response 等,另一些比如通用的方法,比如 print_rpage_cachevanilla_init,再有比如 Vanilla 定义的各种包加载函数,列表如下:

1
2
3
4
5
6
7
LoadLibrary 	-- 加载项目 library 路径下的 LUA 包
LoadController -- 加载项目 controller
LoadModel -- 加载项目 model 路径下的包,包括 DAO 和 Service
LoadPlugin -- 加载项目 plugins 路径下所定义的插件
LoadApplication -- 加载项目 application 路径下的 LUA 包
LoadApp -- 加载项目根目录下面的 LUA 包
LoadV -- 加载 Vanilla 框架相关的 LUA 包

注:以上有些加载器功能重复,目的在于减短所传递参数的长度,比如加载 Index Controller, 使用 LoadController 方法是,只需要写 LoadController('index'), 而如果使用方法 LoadApp 则应该写成LoadApp(‘application.controllers.index’)`

  • 方法 page_cache

该方法调用 Vanilla 封装的页面缓存逻辑,详细内容参见 (进阶/页缓存)

  • 单步调试方法 print_rsprint_r

调试系列方法主要为了开发时能清晰方便的查看变量状态,记录开发日志等功能,详细内容参见 (快速上手/如何调试)

  • 方法 init_vanilla

方法 init_vanilla 主要完成框架基础功能的初始化,比如 Registry 的初始化,各种 Loader 的定义,页面缓存的实现等,本方法默认在应用请求处理入口的第一句语句执行

3、Libs

3.1、Cookie

Vanilla 中封装了 vanilla.v.libs.cookie 包,源至 lua-resty-cookie,提供了简单的 getsetgetAll 等方法来控制 Cookie,下面具体使用举例如下:

vanilla.v.libs.cookie 包使用

一例胜千言:

1
2
3
4
5
6
7
8
9
10
11
12
13
14
15
16
17
18
19
20
local IndexController = {}

-- 载入 vanilla.v.libs.cookie 包
local vcookie_lib = LoadV('vanilla.v.libs.cookie')

function IndexController:index()

-- 实例化 vanilla.v.libs.cookie 类
local cookie = vcookie_lib()

-- 调用 set 方法,设置 cookie
cookie:set('idevz', 'kkkk', {expires=1000})
cookie:set('idevz_api', 'kkkk', {expires=1000,path='/'})

-- 调用 getAll 方法,获取所有 cookie,也可以调用 get 获取单个cookie
print_r(cookie:getAll())
do return '' end
end

return IndexController

注:

vanilla.v.libs.cookie 支持以下 cookie 选项

1
2
3
4
5
6
7
path
domain
max_age
secure
httponly
samesite
extension

4、进阶

4.1、页缓存

4.1.1、Vanilla 的 Page Cache

vanilla 的 Page Cache 实现了类似 Nginx 的 FastCGICache 或者 ProxyCache 的访问结果整体缓存,以 URI 的一定规则作为缓存的 KEY,属于内存型 Cache,存储位置可配置,默认存储在 OpenResty 共享字典(Share Dict)中,默认生成的项目中 Page Cache 为关闭状态

Page Cache 相关配置

Page Cache 相关的所有配置见项目的 config/application.lua 中, Appconf.page_cache 相关配置段,如下所示:

1
2
3
4
5
6
7
8
Appconf.page_cache = {}
Appconf.page_cache.cache_on = true
-- Appconf.page_cache.cache_handle = 'lru'
Appconf.page_cache.no_cache_cookie = 'va-no-cache'
Appconf.page_cache.no_cache_uris = {
'uris'
}
Appconf.page_cache.build_cache_key_without_args = {'rd'}

配置释意

  • cache_on 缓存开关,true 为开启 Page Cache,false 则为关闭
  • cache_handle 设置 Page Cache 的存储介质,目前支持 Memcache、Redis、resty.lrucache、OpenResty Share Dict,默认为 OpenResty Share Dict
  • no_cache_cookie 设置不缓存的 cookie KEY,Vanilla Page Cache 使用这个设置所指的 cookie KEY 来对某些特殊页面不缓存,默认当页面中有 KEY 为 va-no-cache 这个 COOKIE 的时候,当前页面不缓存
  • no_cache_uris 设置不缓存的 URI 列表,默认配置例如 http://app.com/uris 命中 uris 则,当前页面不缓存
  • build_cache_key_without_args 设置在缓存 KEY 中去除某些参数,比如某些 API 的版本号,或者随机数等,默认配置中的 rd 设置代表,当 URI 中有 rd 参数时,则生成的 Page Cache KEY 中清除这个参数

注:缓存的清理,只需要在请求的 URL 中,添加参数 vapurge

4.2、面向对象

4.2.1、面向对象的 Vanilla

Lua 提供了部分面向对象的语法糖,这仅仅能在开发中提供一个功能不完备的独立 Class 的使用,有 self 可以来引用 LUA 表的某些属性和方法,但是更多的面向对象特性,比如继承,比如类的构造等,LUA 支持的并不是非常好,日常的业务开发中,我们确实有些通用的逻辑可能需要复用,或者数据需要共享,需要有父子关系等等。所以我们在 Vanilla 中,简单封装了部分面向对象的特性,这里我们简单介绍其使用方法。

一个简单的 Vanilla 类

下面我们看一个例子:

类定义

1
2
3
4
5
6
7
8
9
10
11
12
13
local LibA = Class("LibA")

function LibA:idevzDo(params)
local params = params or { lib_bb = 'idevzDo LibA'}
return params
end

function LibA:__construct( data )
self.name = 'name-->' .. data.name
self.sex = 'sex-->' .. data.sex
end

return LibA

代码释意:

  • Class("LibA") 声明一个 Vanilla 类,类名为 LibA
  • LibA:__construct( data ) 提供了一个类 LibA 的构造器,并对相应的属性进行初始化

类使用

1
2
3
local LibA = LoadLibrary('aa')
local liba_instance = LibA({name='idevz',sex='man'})
print_r(liba_instance.sex)

执行结果 sex-->man

代码释意:(类使用的时候需要注意,类的使用分为类文件的加载 Load( 如这里的 LoadLibrary ) 和实例化 LibA()) 两个步骤

  • local LibA = LoadLibrary('aa') 载入类名为 LibA 的类
  • local liba_instance = LibA({name='idevz',sex='man'}) 传入表 {name='idevz',sex='man'} 对类进行相关的实例化
  • liba_instance.sex 是对实例属性的引用

注:载入和实例化也可以一步达成 local liba_instance = LoadLibrary('aa')({name='idevz',sex='man'})

类继承

下面我么定义一个类 LibB,并使之集成于 LibA

类定义

1
2
3
4
5
6
7
8
9
local LibB = Class("LibB", LoadLibrary('LibA'))

function LibB:__construct( data )
local data = data or {name='kk', sex='xxx'}
data.sex = data.sex .. '-->son'
self.parent:__construct(data)
end

return LibB

代码释意:

  • Class("LibB", LoadLibrary('LibA')) 声明一个 Vanilla 类,类名为 LibB 继承自类 LibA
  • self.parent:__construct(data) 构造器中调用父类的构造器

类使用

1
2
3
local LibB = LoadLibrary('LibB')
local libb_instance = LibB({name='idevz',sex='man'})
print_r(libb_instance:idevzDo({doo='xxx'})['doo'])

执行结果 xxx

代码释意:

  • libb_instance:idevzDo 调用父类的 idevzDo 方法

4.3、Vanilla 包开发

4.3.1、Vanilla 的包开发

可以使用任意 LUA 包的开发方式来开发 Vanilla 包(Controllers,Library,Dao,Services等),也可以使用 Vanilla 所提供的 (面向对象) 方式进行开发

对 Controller 使用继承和构造器

下面我们看一个例子:

1
2
3
4
5
6
7
8
local IndexController = Class('controllers.index',
LoadApplication('controllers.base'))

function IndexController:__construct()
self.parent:__construct()
end

return IndexController

5、OpenResty

5.1、OR文档精炼

OR文档精炼

感谢春哥给我们带来这么好的平台,在这里希望能通读 OR 文档,把自己的理解记录下来,并与时俱进的更新

5.1.1、描述 / Description

lua-nginx-module 模块通过标准的 Lua 5.1 解释器,或者 LuaJIT 2.0/2.1 在 Nginx 运行环境中嵌入 Lua,并利用 Nginx 的子请求,允许在 Nginx 的时间模块中集成强大的 Lua 线程(Lua 协程)。

与 Apache 的 mod_lua 和 Lighttpd 的 mod_magnet 不同的是,只要使用 lua-nginx-module 模块为 Lua 提供的 Nginx API 来处理上游服务的请求,诸如 MySQL、PostgreSQL、Memcached、Redis 或者上游的 HTTP Web 服务,网络传输都是 100% 非阻塞的。

至少下面列举的这些 Lua 包,和 Nginx 模块可以与 ngx_lua 模块完美结合使用:

5.1.2、ngx.timer

ngx.timer.at

语法:

ok, err = ngx.timer.at(delay, callback, user_arg1, user_arg2, ...)

上下文:

init_worker_by_lua*, set_by_lua*, rewrite_by_lua*, access_by_lua*, content_by_lua*, header_filter_by_lua*, body_filter_by_lua*, log_by_lua*, ngx.timer.*, balancer_by_lua*, ssl_certificate_by_lua*, ssl_session_fetch_by_lua*, ssl_session_store_by_lua*

使用一个自定义函数以及可选的自定义参数创建一个 Nginx 计时器

第一个参数 delay 以秒为单位指定计时器的延迟时间,支持分秒设置,比如 0.001 在这里表示 1 毫秒延迟。delay 同样可以设置为 0 ,此时如果当前句柄正被唤醒则计时器将立即获得执行。(in which case the timer will immediately expire when the current handler yields execution.//TODO yields)

第二个参数 callback 可以是任何 Lua 函数,后期延迟时间到了,该函数将被以一个后台 “轻线程” 的形式被调用。这个自定义的回调函数将被 Nginx 核心使用 premature 参数、user_arg1、user_arg2 等参数自动调用,参数 premature 是一个 boolean 值,表示当前定时器是否过期以后,而 user_arg1、user_arg2 等参数就是调用 ngx.timer.at 时所传递的余下参数列表。

当 Nginx 工作进程尝试关闭,比如在 Nginx 由于收到 HUP 信号而触发了 Nginx 配置重载的时候,或者 Nginx 服务正在关闭的时候,将会出现无效的计时器(//TODO Premature timer)。当 Nginx 工作进程尝试关闭,将无法通过调用 ngx.timer.at 来创建一个新的非零延迟的计时器,并且此时 ngx.timer.at 将返回 nil 和 “process exiting” 错误。

这个 API 从 v0.9.3 版本开始,即使 Nginx 工作进程开始关闭的时候,仍然允许创建零延迟计时器。

当一个计时器到期时,计时器中用户定义回调的 Lua 代码将在一个与创建这个计时器的源请求完全隔离的 “轻线程” 中运行,所以,源请求生命周期内的对象,比如 cosockets 并不能与回调函数共享。

下面来看一个简单的例子:

1
2
3
4
5
6
7
8
9
10
11
12
13
14
15
16
17
location / {
...
log_by_lua_block {
local function push_data(premature, uri, args, status)
-- push the data uri, args, and status to the remote
-- via ngx.socket.tcp or ngx.socket.udp
-- (one may want to buffer the data in Lua a bit to
-- save I/O operations)
end
local ok, err = ngx.timer.at(0, push_data,
ngx.var.uri, ngx.var.args, ngx.header.status)
if not ok then
ngx.log(ngx.ERR, "failed to create timer: ", err)
return
end
}
}

还可以创建一个无限执行的计时器,例如,一个每 5 秒触发执行一次的计时器,在它的回调方法中递归的调用 ngx.timer.at ,这里给出这样的一个例子。

1
2
3
4
5
6
7
8
9
10
11
12
13
14
15
16
17
18
19
local delay = 5
local handler
handler = function (premature)
-- do some routine job in Lua just like a cron job
if premature then
return
end
local ok, err = ngx.timer.at(delay, handler)
if not ok then
ngx.log(ngx.ERR, "failed to create the timer: ", err)
return
end
end

local ok, err = ngx.timer.at(delay, handler)
if not ok then
ngx.log(ngx.ERR, "failed to create the timer: ", err)
return
end

因为定时器的回调函数都是运行在后端,而且他们的运行时间不会叠加到客户端请求的相应时间中,它们可能会因为 Lua 语法错误,或者过多的客户端请求而很容易在服务端造成累积,或者耗尽系统资源。为了防止出现像 Nginx 服务器宕机这种极端结果,在一个 Nginx 工作进程中提供了对 “等待中的计时器” 和 “运行中的计时器” 这两种计时器的数量限制。这里 “等待中的计时器” 是指还没有过期的计时器,而 “运行中的计时器” 是指那些用户回调方法当前正在运行的计时器。

一个 Nginx 进程中所允许的 “等待中的计时器” 允许的最大数量由 lua_max_pending_timers 指令控制。而允许的 “运行中的计时器” 允许的最大数量由 lua_max_running_timers 指令控制。

目前的实现,每个 “运行中的计时器” 都会从 nginx.conf 配置中 worker_connections 指令配置的全局连接列表中占用一个 (虚) 连接记录,所以必须确保 worker_connections 指令设置了一个足够大的值能同时包含真正的连接数和计时器回调函数运行所需要的虚连接数(这个连接数是有 lua_max_running_timers 指令设限的)。

许多 Nginx 的 Lua API 能在计时器回调函数的上下文中使用,比如操作流和数据包的 cosockets API(ngx.socket.tcpngx.socket.udp),共享内存字典(ngx.shared.DICT),用户协程函数(coroutine.*),用户“轻线程”(ngx.thread.*),ngx.exitngx.now/ngx.timengx.md5/ngx.sha1_bin等都是可用的,但是相关子请求的 API (诸如ngx.location.capture),ngx.req.* API,下游输出 API (诸如 ngx.sayngx.printngx.flush)都是明确在此上下文中不支持的。

你可以给计时器的回调函数传递大部分的标准 Lua 值类型(nils、布尔、数字、字符串、表、闭包、文件句柄等),要么显示的使用用户参数或者隐式的使用回调函数闭包的上游值。然而有一些例外诸如:你不能传递任何由 coroutine.createngx.thread.spawn 返回的线程对象,或者任何由 ngx.socket.tcpngx.socket.udpngx.req.socket 返回的 cosocket 对象,因为这些对象的生命周期是与创建他们的请求上下文绑定的,而计时器的回调函数(设计时)是与创建他们的请求上下文分离的,并且运行在它自己的(虚)请求上下文中。如果你试图跨越创建这些线程和 cosocket 的请求上下文边界来共享这些线程和 cosocket 对象,将会报错,对线程将报错 no co ctx found,对 cosocket 将报错 bad request,然而在计时器回调函数内部来创建这些对象则是没问题的。

这个 API 在 v0.8.0 版本第一次释出。

ngx.timer.running_count

语法:

count = ngx.timer.running_count()

上下文:

init_worker_by_lua*, set_by_lua*, rewrite_by_lua*, access_by_lua*, content_by_lua*, header_filter_by_lua*, body_filter_by_lua*, log_by_lua*, ngx.timer.*, balancer_by_lua*, ssl_certificate_by_lua*, ssl_session_fetch_by_lua*, ssl_session_store_by_lua*

返回当前正在运行的计时器数量。
这个指令在 v0.9.20 版本第一次释出。

ngx.timer.pending_count

语法:

count = ngx.timer.pending_count()

上下文:

init_worker_by_lua*, set_by_lua*, rewrite_by_lua*, access_by_lua*, content_by_lua*, header_filter_by_lua*, body_filter_by_lua*, log_by_lua*, ngx.timer.*, balancer_by_lua*, ssl_certificate_by_lua*, ssl_session_fetch_by_lua*, ssl_session_store_by_lua*

返回当前正在等待的计时器数量。
这个指令在 v0.9.20 版本第一次释出。

5.1.3、ngx.config

ngx.config.subsystem

语法:

subsystem = ngx.config.subsystem

上下文:

set_by_lua*, rewrite_by_lua*, access_by_lua*, content_by_lua*, header_filter_by_lua*, body_filter_by_lua*, log_by_lua*, ngx.timer.*, init_by_lua*, init_worker_by_lua*

这个字符串字段表示了当前基于哪个 Nginx 子系统,对当前模块(ngx_stream_lua_module),这个字段始终返回 “http”,而对 ngx_stream_lua_module 模块,这个字段将返回 “stream”

这个字段在 v0.10.1 版本第一次释出。

ngx.config.debug

语法:

debug = ngx.config.debug

上下文:

set_by_lua*, rewrite_by_lua*, access_by_lua*, content_by_lua*, header_filter_by_lua*, body_filter_by_lua*, log_by_lua*, ngx.timer.*, init_by_lua*, init_worker_by_lua*

*这个布尔字段表示了当前 Nginx 是否打开 debug 编译选项,如编译时配置为 ./configure option --with-debug

这个字段在 v0.8.7 版本第一次释出。

5.1.4、coroutine

coroutine.create

语法:

co = coroutine.create(f)

上下文:

rewrite_by_lua*, access_by_lua*, content_by_lua*, init_by_lua*, ngx.timer.*, header_filter_by_lua*, body_filter_by_lua*, ssl_certificate_by_lua*, ssl_session_fetch_by_lua*, ssl_session_store_by_lua*

使用 Lua 函数创建一个用户态 Lua 协程, 并返回一个协程对象。与标准 Lua 中的协程创建的 API coroutine.create 类似,但是工作在 ngx_lua 模块创建的 Lua 协程上下文中,这个 API 第一次是被使用在 0.9.2 版本的 `init_by_lua` 上下文中。*

这个 API 在 v0.6.0 版本第一次释出。

5.1.5、ngx.thread

ngx.config.subsystem

语法:

co = ngx.thread.spawn(func, arg1, arg2, ...)

上下文:

rewrite_by_lua*, access_by_lua*, content_by_lua*, ngx.timer.*, ssl_certificate_by_lua*, ssl_session_fetch_by_lua*

使用 Lua 函数 func 以及可选的参数 arg1arg2 等生成一个新的用户“轻线程”,返回一个 Lua 线程(或者 Lua 协程)对象代表这个 “轻线程”
“轻线程”仅仅是一种特殊的由 ngx_lua 模块来调度的 Lua 协程。
ngx.thread.spawn 返回之前, func 函数将会被使用响应的可选参数进行调用,直到此函数调用返回、或者因为错误而终止或是因为通过使用 Nginx 的 I/O 操作 API 导致请求挂起(如 tcpsock:receive 操作)。
ngx.thread.spawn 返回后,新被创建的“轻线程”将在各种 I/O 事件中保持通常的异步运行。

所有在 rewrite_by_luaaccess_by_luacontent_by_lua 运行的 Lua 代码块都在一个由 ngx_lua 自动创建的样板“轻线程”中,这些样板“轻线程”通常又叫“入口线程”。

默认情况下,相应的 Nginx 处理程序(例如 rewrite_by_lua 处理程序)不会终止直到“入口线程”和所有的用户“轻线程”都终止,一个“轻线程(要么是“入口线程”要么是“用户轻线程”因为调用 ngx.exitngx.execngx.redirect 或者 ngx.req.set_uri(uri, true))或者“入口线程”因为报错而终止。
当一个用户“轻线程”因为报错而终止,他将不会像“入口线程”一样终止其他线程的运行。

因为 Nginx 子请求模块的限制,一般不允许中止一个正在运行中的 Nginx 子请求。所以同样禁止中止一个运行中的正在等待一个或多个 Nginx 子请求的“轻线程”。你应该调用 ngx.thread.wait 来在结束前等待这些“轻线程”结束。这里有个值得注意的例外是你可以通过使用而且只能使用 ngx.ERROR(-1),408,444或者499 状态调用 ngx.exit 来中止等待的子请求。

“轻线程”不是使用预先抢占的方式来调度的,换句话说,没有自动执行的时间片,一个“轻线程”将保持在 CPU 运行,直到一个(非阻塞)I/O 操作在一个单线程运行不能被完成。

The “light threads” are not scheduled in a pre-emptive way. In other words, no time-slicing is performed automatically. A “light thread” will keep running exclusively on the CPU until
a (nonblocking) I/O operation cannot be completed in a single run,
it calls coroutine.yield to actively give up execution, or
it is aborted by a Lua error or an invocation of ngx.exit, ngx.exec, ngx.redirect, or ngx.req.set_uri(uri, true).
For the first two cases, the “light thread” will usually be resumed later by the ngx_lua scheduler unless a “stop-the-world” event happens.

User “light threads” can create “light threads” themselves. And normal user coroutines created by coroutine.create can also create “light threads”. The coroutine (be it a normal Lua coroutine or a “light thread”) that directly spawns the “light thread” is called the “parent coroutine” for the “light thread” newly spawned.

The “parent coroutine” can call ngx.thread.wait to wait on the termination of its child “light thread”.

You can call coroutine.status() and coroutine.yield() on the “light thread” coroutines.

The status of the “light thread” coroutine can be “zombie” if

the current “light thread” already terminates (either successfully or with an error),
its parent coroutine is still alive, and
its parent coroutine is not waiting on it with ngx.thread.wait.
The following example demonstrates the use of coroutine.yield() in the “light thread” coroutines to do manual time-slicing:

6、Vanilla Change log

6.1、0.1.0-rc3

6.1.1、创建应用

1
2
3
4
5
6
7
8
vanilla new app_name
cd app_name
vanilla start [--trace] -- 默认运行在development环境

## 在linux的bash环境下:
VA_ENV=production vanilla start [--trace] -- 运行在生产环境
## 在BSD等tcsh环境下:
setenv VA_ENV production;vanilla start [--trace] -- 运行在生产环境

6.1.2、代码目录结构

1
2
3
4
5
6
7
8
9
10
11
12
13
14
15
16
17
18
19
20
21
22
23
24
25
26
27
28
29
30
31
32
33
34
35
36
37
38
 /Users/zj-git/app_name/ tree ./
./
├── application(应用代码主体目录)
│   ├── bootstrap.lua(应用初始化 / 可选<以下未标可选为必选>)
│   ├── controllers(应用业务代码主体目录)
│   │   ├── error.lua(应用业务错误处理,处理本路径下相应业务报错)
│   │   └── index.lua(hello world示例)
│   ├── library(应用本地类包)
│   ├── models(应用数据处理类)
│   │   ├── dao(数据层业务处理)
│   │   │   └── table.lua
│   │   └── service(服务化业务处理,对DAO的再次封装)
│   │   └── user.lua
│   ├── nginx(*Openresty所封装Nginx请求处理各Phase)
│   │   └── init.lua(*init_by_lua示例)
│   ├── plugins(插件目录)
│   └── views(视图层,与controllers一一对应)
│   ├── error(错误模板)
│   │   └── error.html
│   └── indexindex controller模板)
│   └── index.html
├── config(应用配置目录)
│   ├── application.lua(应用基础配置 / 路由器、初始化等设置)
│   ├── errors.lua(应用错误信息配置)
│   ├── nginx.conf(nginx配置文件模板)
│   ├── nginx.lua(服务各种运行环境配置 / 是否开启lua_code_cache等)
│   ├── waf-regs(应用防火墙规则配置目录)
│   │   ├── args
│   │   ├── cookie
│   │   ├── post
│   │   ├── url
│   │   ├── user-agent
│   │   └── whiteurl
│   └── waf.lua(服务防火墙配置)
├── logs(日志目录)
│   └── hack(攻击日志目录 / 保持可写权限)
├── pub(应用Nginx配置根路径)
└── index.lua(应用请求入口)

6.1.3、业务代码示例 IndexController

1
2
3
4
5
6
7
8
9
10
11
12
local IndexController = {}

function IndexController:index()
local view = self:getView()
local p = {}
p['vanilla'] = 'Welcome To Vanilla...'
p['zhoujing'] = 'Power by Openresty'
view:assign(p)
return view:display()
end

return IndexController

6.1.4、模板示例 views/index/index.html

1
2
3
4
5
6
7
<!DOCTYPE html>
<html>
<body>
<img src="http://m1.sinaimg.cn/maxwidth.300/m1.sinaimg.cn/120d7329960e19cf073f264751e8d959_2043_2241.png">
<h1><a href = 'https://github.com/idevz/vanilla'>{{vanilla}}</a></h1><h5>{{zhoujing}}</h5>
</body>
</html>

6.2、0.1.0-rc4

0_1_rc4 的安装使用与 0_1_rc3 没有本质区别,相关内容见

6.3、0.1.0-rc5

6.3.1、安装

  • 通过 ./setup-framework 脚本安装 Vanilla

./setup-framework 脚本是对 make install 后面安装方式一个自动化封装,仅需要指定 OpenResty 的安装路径,即可简单安装 Vanilla

1
2
3
4
5
./setup-framework -h
Usage: ./setup-framework
-h show this help info
-v VANILLA_PROJ_ROOT, vanilla project root, will contain vanilla framework and apps
-o OPENRESTY_ROOT, openresty install path(openresty root)

./setup-framework 脚本参数选项说明:

  • -v : 指定 Vanilla 项目的根目录,此选项默认为 /data/vanilla,默认则将 Vanilla 安装到 /data/vanilla/framework/0_1_0_rc5/vanilla/ 目录下。

  • -o : 指定 OpenResty 的安装目录, 此选项默认为 /usr/local/openresty, 如果你的 OpenResty 安装路径与此不同,则需要指定为正真的 OpenResty 安装目录。

安装目录结构如下:

1
2
3
4
5
tree /data/vanilla -L 2
/data/vanilla
├── framework
│   ├── 0_1_0_rc5
│   └── 0_1_0_rc5.old_2016_04_12_11_04_18 # 重复安装则会将之前的老版本按照时间自动备份
  • 通过 make install 安装 Vanilla

Vanilla 支持的选项都提供了默认值,如果你的环境与默认值不一样,请configure时指定成你自己的。

特别注意选项 --openresty-path ,默认为 /usr/local/openresty ,请确保设置正确。

可以在源码目录下执行 configure --help 来查看安装选项的使用方法。

下面是一个简单的安装示例:

1
2
3
./configure --prefix=/usr/local/vanilla --openresty-path=/usr/local/openresty

make install (不需要make,直接make install)

6.3.2、Vanilla 使用

  • Vanilla命令

  • Vanilla-V0.1.0-rc5 目前依旧提供两个命令, 但是 rc5 以后提供的命令与安装的框架代码一样,都自动携带版本号,vanilla-0.1.0.rc5,和 v-console-0.1.0.rc5 这样做的好处在于方便多版本共存以及 Vanilla 的无痛升级*

  • vanilla-0.1.0.rc5 用来初始化应用骨架,而 vanilla-0.1.0.rc5 之后,服务的停启不再通过 vanilla-0.1.0.rc5 命令管理,而是通过项目路径下面的 va-appname-service 脚本进行管理,使用细节见后面说明。
  • v-console-0.1.0.rc5 是一个交互式命令行,主要提供一种方便学习Lua入门的工具,可以使用一些 vanilla 开发环境下的包,比如table输出的 lprint_r 方法等。
  • 创建应用
1
2
3
4
vanilla-0.1.0.rc5 new app_full_path							#使用 vanilla-0.1.0.rc5 命令 自动生成应用骨架,注意这里需要传递应用的全路径,而不只是一个APP_NAME
chmod +x app_full_path/va-appname-service #给生成的项目骨架根目录下面的 va-appname-service 脚本添加执行权限
app_full_path/va-appname-service initconf [dev] #初始化应用的nginx配置文件,此文件基于 app_full_path/nginx_conf 下面的配置文件生成,如果有特殊选项需要配置,可以先修改 app_full_path/nginx_conf 下面的配置文件,再进行 initconf 操作,[dev] 参数为可选项, 加上则表示执行开发环境相关操作,不加则默认为生产环境
app_full_path/va-appname-service start [dev] #启动生成的服务,即可通过http://localhost访问服务,[dev] 参数如上。

上面创建应用的过程也可以通过脚本 ./setup-vanilal-demoapp 简单自动完成:

1
2
3
4
5
6
./setup-vanilal-demoapp -h
Usage: ./setup-vanilal-demoapp -h show this help info
-a VANILLA_APP_ROOT, app absolute path(which path to init app)
-u VANILLA_APP_USER, user to run app
-g VANILLA_APP_GROUP, user group to run app
-e VANILLA_RUNNING_ENV, app running environment

./setup-vanilal-demoapp 脚本参数选项说明:

  • -a : 指定初始化应用的全路径(绝对路径),默认为 /data/vanilla/vademo
  • -u : 指定运行服务的用户名,默认为 idevz
  • -g : 指定运行服务的用户组,默认为 sina
  • -e : 指定运行服务的环境,默认为’’ 指生产环境

安装目录结构如下:

1
2
3
4
5
tree /data/vanilla/ -L 1
/data/vanilla/
├── framework # vanilla 框架安装目录
├── vademo # 应用初始化目录
└── vademo.old_2016_04_12_11_04_26 # 重复安装后会将之前版本按照时间进行备份
  • 应用配置初始化与服务管理

通过脚本 /data/vanilla/vademo/va-vademo-service 管理 vademo 服务

1
2
/data/vanilla/vademo/va-vademo-service -h
Usage: ./va-ok-service {start|stop|restart|reload|force-reload|confinit[-f]|configtest} [dev] #dev 指定了运行的环境,不加 dev 则默认为生产环境。

注意: 如果没有使用 ./setup-vanilal-demoapp 脚本,而是手动 new 的 app, 则在启动服务之前需要先运行 /data/vanilla/vademo/va-vademo-service initconf [dev] 对相应环境的 nginx 配置文件进行初始化。

6.3.3、工程化的vanilla-0.1.0.rc5

vanilla-0.1.0.rc5是vanilla-0.1.0.rc4在新浪移动全线推广过程中针对一些工程化部署问题改进版本,可以肯定的一点vanilla-0.1.0.rc4在功能、扩展性、使用方面表现良好,非常适合移动业务的场景,更不止于API,但是在集群部署、多App部署、Vanilla框架升级等方面vanilla-0.1.0.rc4存在短板,而vanilla-0.1.0.rc5极大程度的弥补了这些短板。

  • 推荐始终使用最新版的Vanilla

当前Vanilla最新版本0.1.0.rc5,支持命令:

  • vanilla-0.1.0.rc5(你没看错,自0.1.0.rc5起,vanilla的命令行和框架代码都带着版本号,方便多版本共存,也方便框架升级
  • v-console-0.1.0.rc5

6.3.4、如何从vanilla-0.1.0.rc4到vanilla-0.1.0.rc5

升级步骤
  • 安装最新的 vanilla-0.1.0.rc5
1
2
3
4
$ wget https://github.com/idevz/vanilla/archive/v0.1.0-rc5.0.tar.gz
$ tar zxf v0.1.0-rc5.0.tar.gz
$ cd vanilla-0.1.0.rc5
$ ./setup-framework -v $VANILLA_PROJ_ROOT -o $OPENRESTY_ROOT #$VANILLA_PROJ_ROOT 为给 Vanilla 指定的安装目录, $OPENRESTY_ROOT 是当前 OpenResty 的安装目录
  • 基于新的 Vanilla(vanilla-0.1.0.rc5) 初始化新版的 vatest 项目:
1
$ sudo vanilla-0.1.0.rc5 new $VANILLA_APP_ROOT      #$VANILLA_APP_ROOT 为新版 vatest 项目全路径
  • 将新项目中的以下目录及文件直接覆盖至老版 vatest 的相关位置:

    • pub/index.lua 文件($VANILLA_APP_ROOT/pub/index.lua)直接覆盖
    • va-vasina-service 脚本($VANILLA_APP_ROOT/va-vasina-service)直接复制,因为老版没有这个文件
      • 注意确认脚本中 $OPENRESTY_NGINX_ROOT 的路径
      • 注意确认脚本中 $VA_APP_PATH 的路径是否为项目的根路径
    • nginx_conf 目录($VANILLA_APP_ROOT/nginx_conf)直接复制,因为老版没有这个目录
    • application/bootstrap.lua 文件($VANILLA_APP_ROOT/application/bootstrap.lua)将老项目 bootstrap 中的相关 init* 方法拷贝到新的 bootstrap.lua 中,并用新的 bootstrap.lua 覆盖老版的 bootstrap.lua 文件
    • 修改 $VANILLA_APP_ROOT/nginx_conf 中的 nginx 配置文件, 确保其中各种目录正确
      • 确保 $VANILLA_APP_ROOT/nginx_conf/va-nginx{-development}.conf 文件中 lua_package_{c}path 中, 全路径的 Vanilla 框架目录正确
      • 确保 $VANILLA_APP_ROOT/nginx_conf/{dev_}vhost/vasina.conf 文件中 Server 段的 root 配置为项目根目录, require 方法中 local VANILLA_ROOT 为框架根路径
  • 使用 $VANILLA_APP_ROOT/va-vasina-service 脚本管理服务:
  1. $VANILLA_APP_ROOT/va-vasina-service 脚本添加可执行权限 chmod +x $VANILLA_APP_ROOT/va-vasina-service
  2. 初始化 nginx 配置 $VANILLA_APP_ROOT/va-vasina-service initconf [dev]
  3. 启动服务 $VANILLA_APP_ROOT/va-vasina-service start [dev]

注: 添加 dev 参数,则管理 development 环境的服务, 默认为 production 生产环境服务

6.4、0.1.0-rc6

6.5、0.1.0-rc7

  • Add lemplate 模板引擎
  • Add dynamic dns for lib.http

7、Nginx执行阶段

我的理解Openresty = Nginx + ngx_http_lua_module + lua_resty_* ;它是一个原生Nginx合上一个HTTP_LUA模块,在加上一系列Lua_resty模块组成的一个Ngx_Lua高性能服务生态。

7.1、Openresty处理HTTP请求的执行阶段

Openrestry处理HTTP请求的执行阶段来自于Nginx,Nginx的HTTP框架依据常见的处理流程将处理阶段划分为11个阶段,其中每个处理阶段可以由任意多个HTTP模块流水式地处理请求,Openresty通过ngx_http_lua_module将Lua特性嵌入Nginx,ngx_http_lua_module属于一个Nginx的HTTP模块,为高性能服务开发封装了7个相应HTTP请求处理阶段如下:

  • set_by_lua
  • content_by_lua
  • rewrite_by_lua
  • access_by_lua
  • header_filter_by_lua
  • body_filter_by_lua
  • log_by_lua

有同学会发现,Openresty所提供的LUA解析指令还有以下两个:

  • init_by_lua
  • init_worker_by_lua

init_by_lua 作用在配置加载阶段,init_worker_by_lua作用在worker进程初始化阶段,并非HTTP请求处理阶段。

另外,需要重点提一下的是,Nginx输出过滤器是流式处理模型,一个数据块body filter就被调用一次。可以用以下简单的例子测试验证:

nginx.conf

1
2
3
4
5
6
7
8
9
10
11
12
13
14
15
16
17
18
19
20
21
22
23
24
25
26
27
28
29
30
31
32
33
34
35
36
37
38
39
40
41
42
43
44
45
46
http {
# use sendfile
sendfile on;

# Va initialization
lua_package_path "...;;";
lua_package_cpath "...;";
lua_code_cache off;

init_by_lua_block {ngx.log(ngx.ERR, '=======>init')}
init_worker_by_lua_block {ngx.log(ngx.ERR, '=======>init_worker')}
rewrite_by_lua_block {ngx.log(ngx.ERR, '=======>rewrite')}
access_by_lua_block {ngx.log(ngx.ERR, '=======>access')}
header_filter_by_lua_block {ngx.log(ngx.ERR, '=======>header_filter')}
body_filter_by_lua_block {ngx.log(ngx.ERR, '=======>body_filter')}
log_by_lua_block {ngx.log(ngx.ERR, '=======>log')}


server {
# List port
listen 7200;
set $template_root '';
set_by_lua_block $a {ngx.log(ngx.ERR, '=======>set'); return 'xxx'}

# Access log with buffer, or disable it completetely if unneeded
access_log logs/development-access.log combined buffer=16k;
# access_log off;

# Error log
error_log logs/development-error.log;

# Va runtime
location / {
content_by_lua_block {
ngx.log(ngx.ERR, '=======>content')
ngx.say('----------')
ngx.say('---ccc-------')
ngx.say('---vvvv-------')
ngx.say('---vdddv-------')
ngx.say('---ggvv-------')
}

# content_by_lua_file ./pub/index.lua;
}
}
}

logs/development-error.log截取

1
2
3
4
5
6
7
8
9
10
11
12
set_by_lua:1: =======>set
rewrite_by_lua(development-nginx.conf:31):1: =======>rewrite
access_by_lua(development-nginx.conf:32):1: =======>access
content_by_lua(development-nginx.conf:60):2: =======>content
header_filter_by_lua:1: =======>header_filter
body_filter_by_lua:1: =======>body_filter
log_by_lua(development-nginx.conf:35):1: =======>log while logging request

可以看出body_filter的执行次数等于ngx.say数量加一

8、GDB 调试 OpenResty

8.1、使用 GDB 调试 Nginx

1
sudo gdb -q -tui # -q 安静模式启动 GDB -tui 显示代码界面

进入 GDB 运行 attach Nginx 子进程报错如下:
issing separate debuginfos, use: debuginfo-install libgcc-4.8.5-4.el7.x86_64 zlib-1.2.7-17.el7.x86_64
直接安装即可

8.2、断点

ngx_process_events_and_timers
子进程即 worker 进程在运行后会停留在epoll_wait 处等待相应的事件发生,而这个函数调用被封装在 ngx_process_events_and_timers

1
2
3
4
5
6
7
8
9
10
11
12
13
14
15
16
17
18
19
20
21
22
23
24
25
26
27
28
29
30
31
32
33
34
35
36
37
38
39
40
1       breakpoint     keep y   0x000000000046c8f0 in ngx_process_events_and_timers at src/event/ngx_event.c:195
breakpoint already hit 39 times
2 breakpoint keep y 0x000000000046c93e in ngx_process_events_and_timers at src/event/ngx_event.c:242
breakpoint already hit 36 times
3 breakpoint keep y 0x000000000046c95a in ngx_process_events_and_timers at src/event/ngx_event.c:249
breakpoint already hit 35 times
4 breakpoint keep y 0x000000000046ce7d in ngx_event_process_posted at src/event/ngx_event_posted.c:33
5 breakpoint keep y 0x0000000000475c24 in ngx_epoll_process_events at src/event/modules/ngx_epoll_module.c:793
breakpoint already hit 25 times
6 breakpoint keep y 0x0000000000475d28 in ngx_epoll_process_events at src/event/modules/ngx_epoll_module.c:926
7 breakpoint keep y 0x0000000000476022 in ngx_epoll_process_events at src/event/modules/ngx_epoll_module.c:900
breakpoint already hit 28 times
8 breakpoint keep y 0x000000000048cd4a in ngx_http_wait_request_handler at src/http/ngx_http_request.c:497
breakpoint already hit 6 times
9 breakpoint keep y 0x000000000048cd6a in ngx_http_wait_request_handler at src/http/ngx_http_request.c:504
breakpoint already hit 7 times
10 breakpoint keep y 0x000000000048c900 in ngx_http_process_request_line at src/http/ngx_http_request.c:945
breakpoint already hit 6 times
11 breakpoint keep y 0x000000000048c912 in ngx_http_process_request_line at src/http/ngx_http_request.c:952
breakpoint already hit 6 times
12 breakpoint keep y 0x000000000048ca95 in ngx_http_process_request_line at src/http/ngx_http_request.c:1011
13 breakpoint keep y 0x000000000048cbce in ngx_http_process_request_line at src/http/ngx_http_request.c:1027
breakpoint already hit 6 times
14 breakpoint keep y 0x000000000048c5ef in ngx_http_process_request_headers at src/http/ngx_http_request.c:1322
breakpoint already hit 7 times
15 breakpoint keep y 0x000000000048c7ed in ngx_http_process_request_headers at src/http/ngx_http_request.c:1342
breakpoint already hit 2 times
16 breakpoint keep y 0x000000000048c826 in ngx_http_process_request_headers at src/http/ngx_http_request.c:1348
breakpoint already hit 2 times
17 breakpoint keep y 0x000000000048c231 in ngx_http_process_request at src/http/ngx_http_request.c:1916
breakpoint already hit 2 times
18 breakpoint keep y 0x0000000000480757 in ngx_http_handler at src/http/ngx_http_core_module.c:839
breakpoint already hit 2 times
19 breakpoint keep y 0x0000000000484ced in ngx_http_core_rewrite_phase at src/http/ngx_http_core_module.c:910
20 breakpoint keep y 0x0000000000485e60 in ngx_http_core_content_phase at src/http/ngx_http_core_module.c:1372
breakpoint already hit 1 time
21 breakpoint keep y 0x0000000000485eac in ngx_http_core_content_phase at src/http/ngx_http_core_module.c:1386
22 breakpoint keep y 0x0000000000485e7d in ngx_http_core_content_phase at src/http/ngx_http_core_module.c:1379
breakpoint already hit 1 time
23 breakpoint keep y 0x0000000000504c19 in ngx_http_lua_content_handler at ../ngx_lua-0.10.6/src/ngx_http_lua_contentby.c:222

8.3、Lua 请求处理

8.3.1、堆栈

1
2
3
4
5
6
7
8
9
10
11
12
13
14
15
16
17
18
19
20
21
22
23
24
25
26
27
28
29
30
31
32
0  __libc_writev (fd=3, vector=0x7ffe08245dd0, count=14) at ../sysdeps/unix/sysv/linux/writev.c:68
1 0x00000000004717e9 in ngx_writev (c=c@entry=0x7ff03d02f730, vec=vec@entry=0x7ffe08245db0) at src/os/unix/ngx_writev_chain.c:189
2 0x0000000000476a7e in ngx_linux_sendfile_chain (c=0x7ff03d02f730, in=0x7ff03d001418, limit=2147479551) at src/os/unix/ngx_linux_sendfile_chain.c:215
3 0x00000000004a7d15 in ngx_http_write_filter (r=0x7ff03cfffcf0, in=0x7ff03d001b78) at src/http/ngx_http_write_filter_module.c:254
4 0x00000000004a909d in ngx_http_chunked_body_filter (r=0x7ff03cfffcf0, in=<optimized out>) at src/http/modules/ngx_http_chunked_filter_module.c:224
5 0x00000000004ac7dc in ngx_http_gzip_body_filter (r=0x7ff03cfffcf0, in=0x7ffe082466d0) at src/http/modules/ngx_http_gzip_filter_module.c:326
6 0x00000000004afd95 in ngx_http_ssi_body_filter (r=0x7ff03cfffcf0, in=<optimized out>) at src/http/modules/ngx_http_ssi_filter_module.c:411
7 0x00000000004b2cf0 in ngx_http_charset_body_filter (r=0x7ff03cfffcf0, in=0x7ffe082466d0) at src/http/modules/ngx_http_charset_filter_module.c:647
8 0x0000000000506c7c in ngx_http_lua_capture_body_filter (r=0x7ff03cfffcf0, in=0x7ffe082466d0) at ../ngx_lua-0.10.6/src/ngx_http_lua_capturefilter.c:133
9 0x0000000000453395 in ngx_output_chain (ctx=ctx@entry=0x7ff03d001428, in=in@entry=0x7ffe082466d0) at src/core/ngx_output_chain.c:74
10 0x00000000004b4f95 in ngx_http_copy_filter (r=0x7ff03cfffcf0, in=0x7ffe082466d0) at src/http/ngx_http_copy_filter_module.c:152
11 0x0000000000485a37 in ngx_http_output_filter (r=r@entry=0x7ff03cfffcf0, in=in@entry=0x7ffe082466d0) at src/http/ngx_http_core_module.c:1979
12 0x0000000000489e33 in ngx_http_send_special (r=r@entry=0x7ff03cfffcf0, flags=flags@entry=1) at src/http/ngx_http_request.c:3358
13 0x00000000004ffc38 in ngx_http_lua_send_special (flags=1, r=0x7ff03cfffcf0) at ../ngx_lua-0.10.6/src/ngx_http_lua_util.c:569
14 ngx_http_lua_send_chain_link (r=0x7ff03cfffcf0, ctx=<optimized out>, in=0x0) at ../ngx_lua-0.10.6/src/ngx_http_lua_util.c:523
15 0x0000000000501f5f in ngx_http_lua_run_thread (L=L@entry=0x40030378, r=r@entry=0x7ff03cfffcf0, ctx=ctx@entry=0x7ff03d000dc8, nrets=nrets@entry=0) at ../ngx_lua-0.10.6/src/ngx_http_lua_util.c:1476
16 0x00000000005050f0 in ngx_http_lua_content_by_chunk (L=L@entry=0x40030378, r=r@entry=0x7ff03cfffcf0) at ../ngx_lua-0.10.6/src/ngx_http_lua_contentby.c:120
17 0x000000000050548d in ngx_http_lua_content_handler_file (r=0x7ff03cfffcf0) at ../ngx_lua-0.10.6/src/ngx_http_lua_contentby.c:284
18 0x0000000000504c21 in ngx_http_lua_content_handler (r=0x7ff03cfffcf0) at ../ngx_lua-0.10.6/src/ngx_http_lua_contentby.c:222
19 0x0000000000485e7f in ngx_http_core_content_phase (r=0x7ff03cfffcf0, ph=<optimized out>) at src/http/ngx_http_core_module.c:1379
20 0x0000000000480675 in ngx_http_core_run_phases (r=r@entry=0x7ff03cfffcf0) at src/http/ngx_http_core_module.c:856
21 0x000000000048075c in ngx_http_handler (r=r@entry=0x7ff03cfffcf0) at src/http/ngx_http_core_module.c:839
22 0x000000000048c249 in ngx_http_process_request (r=0x7ff03cfffcf0) at src/http/ngx_http_request.c:1916
23 0x000000000048cbf6 in ngx_http_process_request_line (rev=0x7ff03d069520) at src/http/ngx_http_request.c:1027
24 0x0000000000476029 in ngx_epoll_process_events (cycle=0x7ff03cffbce0, timer=<optimized out>, flags=<optimized out>) at src/event/modules/ngx_epoll_module.c:900
25 0x000000000046c947 in ngx_process_events_and_timers (cycle=cycle@entry=0x7ff03cffbce0) at src/event/ngx_event.c:242
26 0x0000000000473d35 in ngx_worker_process_cycle (cycle=cycle@entry=0x7ff03cffbce0, data=data@entry=0x0) at src/os/unix/ngx_process_cycle.c:753
27 0x0000000000472820 in ngx_spawn_process (cycle=cycle@entry=0x7ff03cffbce0, proc=0x473cf0 <ngx_worker_process_cycle>, data=0x0, name=0x6e22f5 "worker process", respawn=respawn@entry=0)
at src/os/unix/ngx_process.c:198
28 0x0000000000475216 in ngx_reap_children (cycle=0x7ff03cffbce0) at src/os/unix/ngx_process_cycle.c:621
29 ngx_master_process_cycle (cycle=cycle@entry=0x7ff03cffbce0) at src/os/unix/ngx_process_cycle.c:174
30 0x000000000044e139 in main (argc=<optimized out>, argv=<optimized out>) at src/core/nginx.c:367

8.3.2、断点

1
2
3
4
5
6
7
8
9
10
11
12
13
14
15
16
17
18
19
20
21
22
23
24
25
26
27
28
29
30
31
32
33
34
35
36
37
38
39
40
41
42
43
44
45
46
47
48
49
50
51
52
53
54
55
56
57
58
59
60
61
62
63
64
65
66
67
68
69
1       breakpoint     keep y   0x000000000048c420 in ngx_http_process_request_headers at src/http/ngx_http_request.c:1185
breakpoint already hit 13 times
2 breakpoint keep y 0x0000000000504ba0 in ngx_http_lua_content_handler at ../ngx_lua-0.10.6/src/ngx_http_lua_contentby.c:154
breakpoint already hit 13 times
3 breakpoint keep y 0x0000000000504c98 in ngx_http_lua_content_handler at ../ngx_lua-0.10.6/src/ngx_http_lua_contentby.c:189
4 breakpoint keep y 0x0000000000504c19 in ngx_http_lua_content_handler at ../ngx_lua-0.10.6/src/ngx_http_lua_contentby.c:222
breakpoint already hit 8 times
5 breakpoint keep y 0x0000000000505482 in ngx_http_lua_content_handler_file at ../ngx_lua-0.10.6/src/ngx_http_lua_contentby.c:284
breakpoint already hit 8 times
6 breakpoint keep y 0x0000000000505024 in ngx_http_lua_content_by_chunk at ../ngx_lua-0.10.6/src/ngx_http_lua_contentby.c:54
breakpoint already hit 8 times
7 breakpoint keep y 0x00000000005050e0 in ngx_http_lua_content_by_chunk at ../ngx_lua-0.10.6/src/ngx_http_lua_contentby.c:120
breakpoint already hit 8 times
8 breakpoint keep y 0x00000000005014d3 in ngx_http_lua_run_thread at ../ngx_lua-0.10.6/src/ngx_http_lua_util.c:1005
breakpoint already hit 22 times
9 breakpoint keep y 0x0000000000501f58 in ngx_http_lua_run_thread at ../ngx_lua-0.10.6/src/ngx_http_lua_util.c:1476
breakpoint already hit 8 times
10 breakpoint keep y 0x00000000004ffc4a in ngx_http_lua_send_chain_link at ../ngx_lua-0.10.6/src/ngx_http_lua_util.c:484
11 breakpoint keep y 0x00000000004ffb63 in ngx_http_lua_send_chain_link at ../ngx_lua-0.10.6/src/ngx_http_lua_util.c:557
breakpoint already hit 7 times
12 breakpoint keep y 0x00000000004ffb86 in ngx_http_lua_send_chain_link at ../ngx_lua-0.10.6/src/ngx_http_lua_util.c:523
breakpoint already hit 6 times
13 breakpoint keep y 0x00000000004ffc2b in ngx_http_lua_send_chain_link at ../ngx_lua-0.10.6/src/ngx_http_lua_util.c:569
breakpoint already hit 6 times
14 breakpoint keep y 0x0000000000489e1b in ngx_http_send_special at src/http/ngx_http_request.c:3358
breakpoint already hit 6 times
15 breakpoint keep y 0x0000000000485a2b in ngx_http_output_filter at src/http/ngx_http_core_module.c:1979
breakpoint already hit 30 times
16 breakpoint keep y 0x0000000000506c70 in ngx_http_lua_capture_body_filter at ../ngx_lua-0.10.6/src/ngx_http_lua_capturefilter.c:133
breakpoint already hit 30 times
17 breakpoint keep y 0x00000000004b2ce1 in ngx_http_charset_body_filter at src/http/modules/ngx_http_charset_filter_module.c:647
breakpoint already hit 30 times
18 breakpoint keep y 0x00000000004afd89 in ngx_http_ssi_body_filter at src/http/modules/ngx_http_ssi_filter_module.c:411
breakpoint already hit 25 times
19 breakpoint keep y 0x00000000004ad41d in ngx_http_postpone_filter at src/http/ngx_http_postpone_filter_module.c:82
breakpoint already hit 25 times
20 breakpoint keep y 0x00000000004ac7d0 in ngx_http_gzip_body_filter at src/http/modules/ngx_http_gzip_filter_module.c:326
breakpoint already hit 25 times
21 breakpoint keep y 0x00000000004a908f in ngx_http_chunked_body_filter at src/http/modules/ngx_http_chunked_filter_module.c:224
breakpoint already hit 25 times
22 breakpoint keep y 0x00000000004a7cff in ngx_http_write_filter at src/http/ngx_http_write_filter_module.c:254
breakpoint already hit 5 times
23 breakpoint keep y 0x00000000004769e1 in ngx_linux_sendfile_chain at src/os/unix/ngx_linux_sendfile_chain.c:92
breakpoint already hit 4 times
24 breakpoint keep y 0x0000000000476957 in ngx_linux_sendfile_chain at src/os/unix/ngx_linux_sendfile_chain.c:49
breakpoint already hit 4 times
25 breakpoint keep y 0x00000000004b4f8a in ngx_http_copy_filter at src/http/ngx_http_copy_filter_module.c:152
breakpoint already hit 5 times
26 breakpoint keep y 0x000000000045338b in ngx_output_chain at src/core/ngx_output_chain.c:74
breakpoint already hit 5 times
27 breakpoint keep y 0x0000000000476a71 in ngx_linux_sendfile_chain at src/os/unix/ngx_linux_sendfile_chain.c:215
breakpoint already hit 1 time
28 breakpoint keep y 0x0000000000476a71 in ngx_linux_sendfile_chain at src/os/unix/ngx_linux_sendfile_chain.c:215
breakpoint already hit 1 time
29 breakpoint keep y 0x0000000000476a71 in ngx_linux_sendfile_chain at src/os/unix/ngx_linux_sendfile_chain.c:21
30 breakpoint keep y 0x0000000000476a71 in ngx_linux_sendfile_chain at src/os/unix/ngx_linux_sendfile_chain.c:215
breakpoint already hit 1 time
31 breakpoint keep y 0x0000000000476a71 in ngx_linux_sendfile_chain at src/os/unix/ngx_linux_sendfile_chain.c:215
breakpoint already hit 1 time
32 breakpoint keep y 0x0000000000476a71 in ngx_linux_sendfile_chain at src/os/unix/ngx_linux_sendfile_chain.c:215
breakpoint already hit 1 time
33 breakpoint keep y 0x0000000000476a71 in ngx_linux_sendfile_chain at src/os/unix/ngx_linux_sendfile_chain.c:215
breakpoint already hit 1 time
34 breakpoint keep y 0x0000000000476a71 in ngx_linux_sendfile_chain at src/os/unix/ngx_linux_sendfile_chain.c:215
breakpoint already hit 1 time
35 breakpoint keep y 0x0000000000476a71 in ngx_linux_sendfile_chain at src/os/unix/ngx_linux_sendfile_chain.c:215
breakpoint already hit 1 time
36 breakpoint keep y 0x0000000000476a71 in ngx_linux_sendfile_chain at src/os/unix/ngx_linux_sendfile_chain.c:215
breakpoint already hit 1 time

8.4、使用 GDB 调试 OpenResty

8.4.1、加断点

比如 ngx_http_lua_ffi_worker_pid

1
2
3
4
5
6
7
8
9
10
11
12
13
14
15
16
17
18
19
20
21
local ffi = require 'ffi'
local C = ffi.C


ffi.cdef[[
int ngx_http_lua_ffi_worker_pid(void);
]]

local _M = { _VERSION = '0.10' }
local mt = { __index = _M }

function _M.new(self)
local _m_name = 'weibo.com'
return setmetatable({ m_name = _m_name }, mt)
end

function _M.getWorkerPid(self)
return C.ngx_http_lua_ffi_worker_pid()
end

return _M

运行调用这个包的代码,则可以在 GDB 中加断点 ngx_http_lua_ffi_worker_pid 即可直接追踪 OpenResty 的大致运行过程。通过 c 继续下一步

breakpoints

1
2
3
4
5
6
7
8
9
10
11
12
13
14
15
16
17
18
19
ngx_http_process_request_headers
ngx_http_lua_content_handler
ngx_http_lua_content_handler_file
ngx_http_lua_content_by_chunk
ngx_http_lua_run_thread
ngx_http_lua_send_chain_link
ngx_http_send_special
ngx_http_output_filter
ngx_http_lua_capture_body_filter
ngx_http_charset_body_filter
ngx_http_ssi_body_filter
ngx_http_postpone_filter
ngx_http_gzip_body_filter
ngx_http_chunked_body_filter
ngx_http_write_filter
ngx_linux_sendfile_chain
ngx_http_copy_filter
ngx_output_chain
ngx_linux_sendfile_chain

9、基于 OpenResty 安装 Luarocks

基于 OpenResty 来安装 其实意在基于 OpenResty 自带的 Luajit 来安装 Luarocks, Luarocks 安装时需要指定 lua 目录和 lua 的 include 目录,而 OpenResty 自身带有的 Luajit 就包含所需的 Lua 解释器和头文件。

只不过 Luarocks 安装需要的是 Lua 而不是 Luajit,这就是关键的一步

1
2
3
4
5
6
7
8
9
10
# 我本机的 OpenResty 安装路径为 /usr/local/openresty-1.11.2.1/
# OpenResty 本身带的 Lua 解释器 Luajit 在 /usr/local/openresty-1.11.2.1/luajit/bin/ 路径
# OpenResty 本身带的 Lua 相关头文件 include 在 /usr/local/openresty-1.11.2.1/luajit/include/ 路径
# 我们需要做的就是建一个软连接,给 Luarocks 使用

cd /usr/local/openresty-1.11.2.1/luajit/bin
sudo ln -sf luajit-2.1.0-beta2 lua

cd /usr/local/openresty-1.11.2.1/luajit/include
sudo ln -sf luajit-2.1 lua5.1

经过以上几步的准备工作,就可以进入正常的安装步骤,演示如下:

1
2
3
./configure --with-lua-bin=/usr/local/openresty-1.11.2.1/luajit/bin --with-lua-include=/usr/local/openresty-1.11.2.1/luajit/include --prefix=/usr/local/luarocks-2.4.1
sudo make build
sudo make install

安装完毕后,只需要将 Luarocks 安装路径的 bin 目录(/usr/local/luarocks-2.4.1/bin)加到 PATH 环境变量下,即可使用 luarocks 命令来管理标准 Lua 包,使用 Luarocks 安装的包将保存在 Luarocks 安装的 share 目录,而可执行文件(比如 Vanilla 的可执行命令 vanilla 和 v-console)都在 luarocks 命令同级目录。

10、Vanilla集成的一些优秀第三方包

这里记录下vanilla中默认集成的一些优秀第三方包.

  • Waf
  • 模板引擎
  • 工具包

10.1、Waf

ngx_lua_waf

10.2、模板引擎

lua-resty-template

openresty-lemplate

vanilla-rc7 后默认使用此种模板引擎

10.3、工具包

Penlight

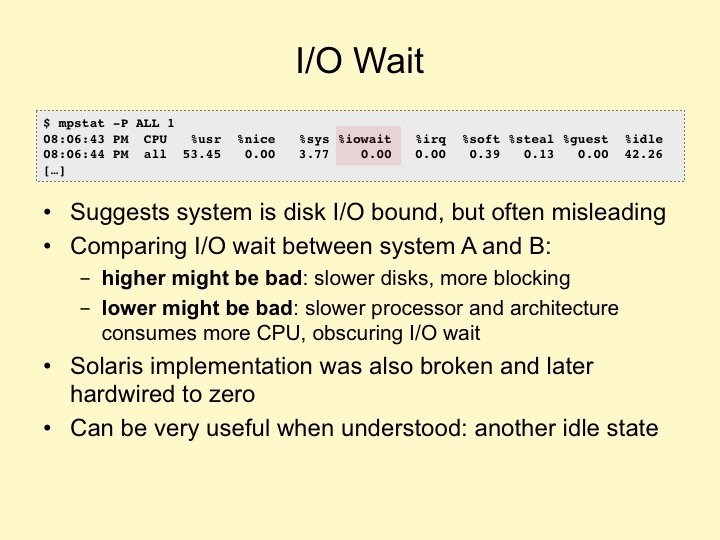
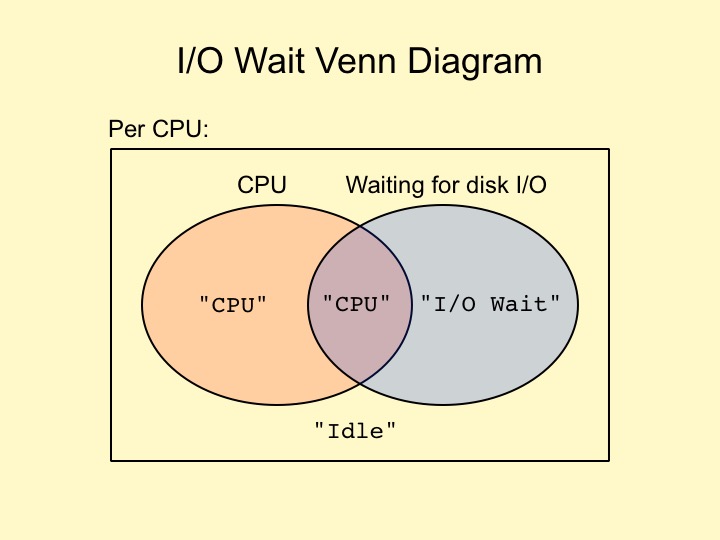
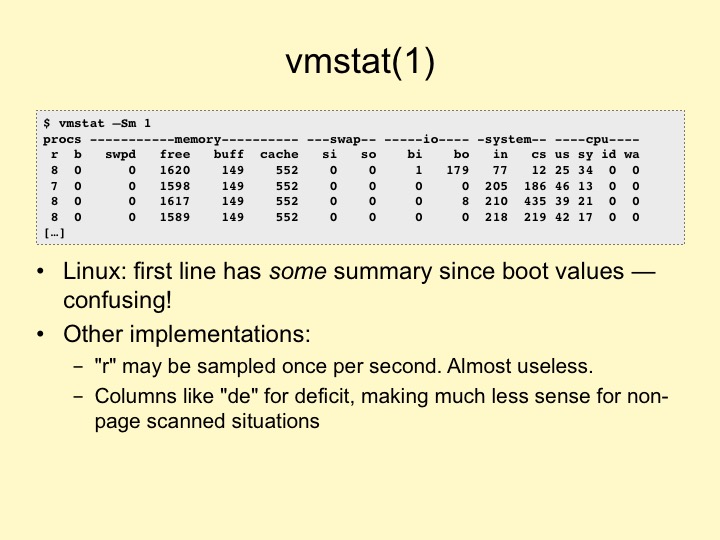
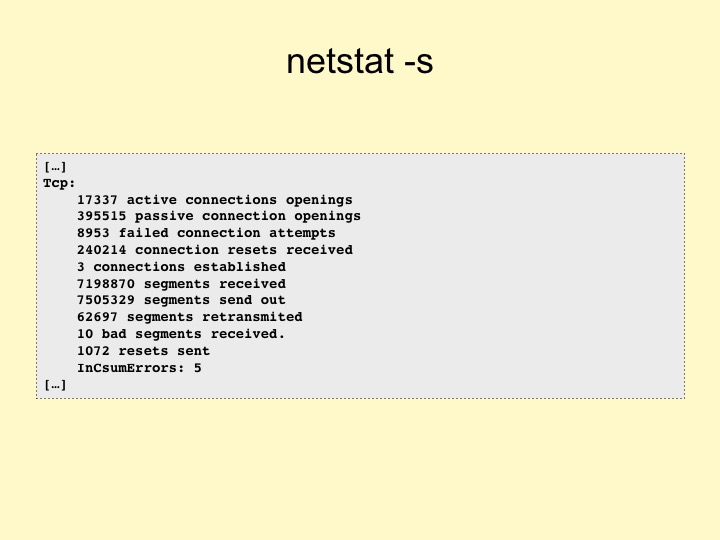
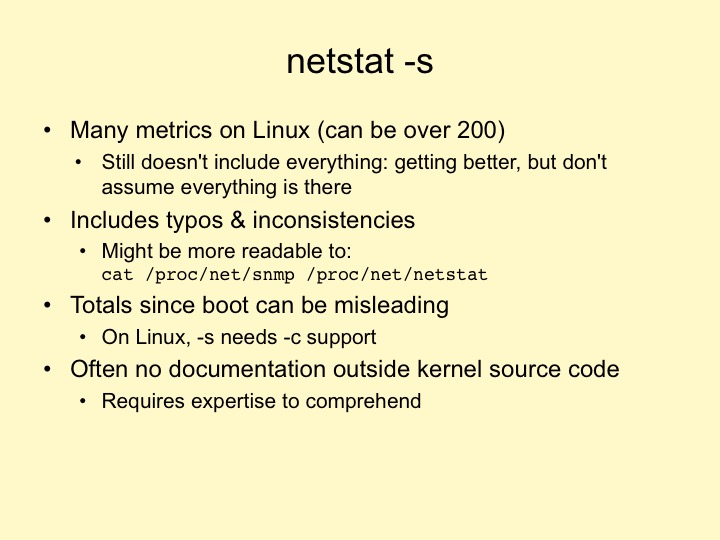
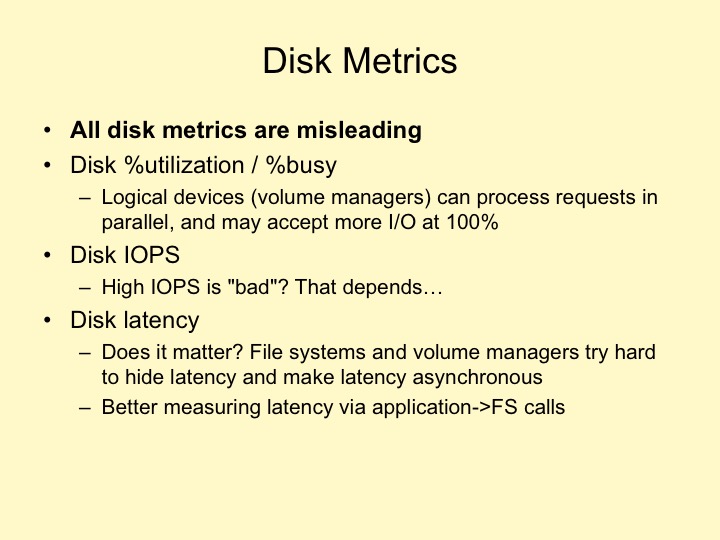
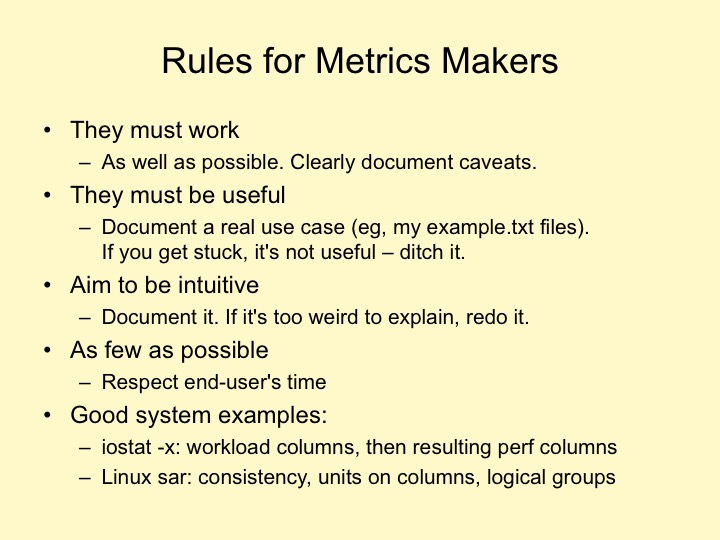
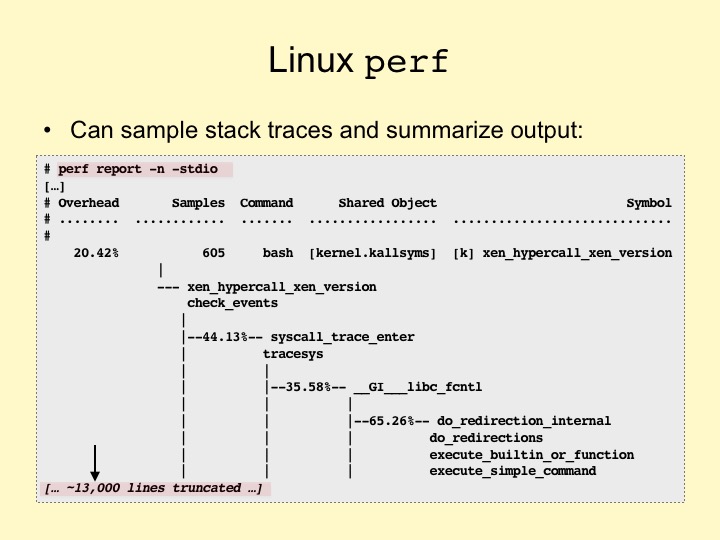
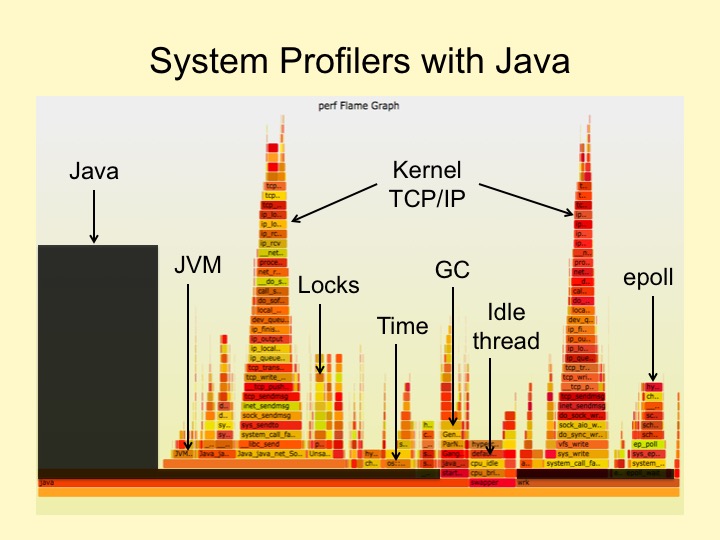
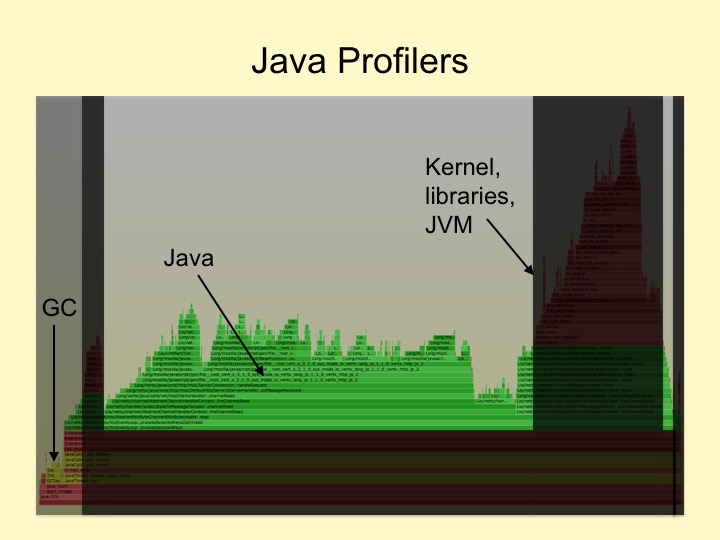
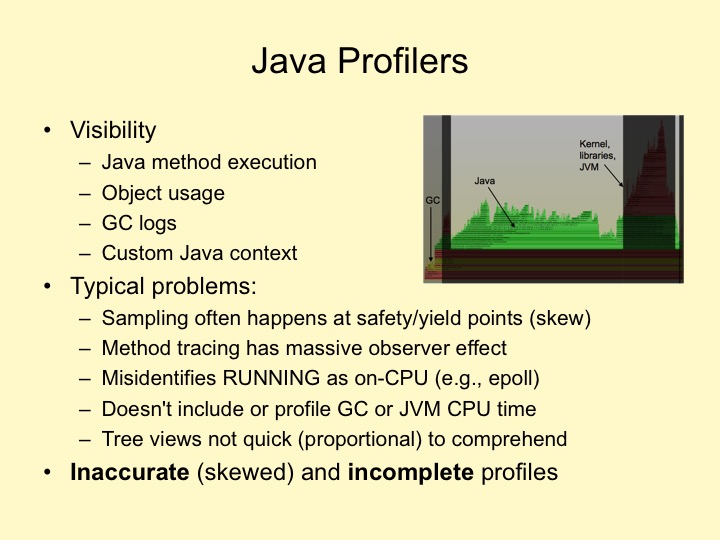
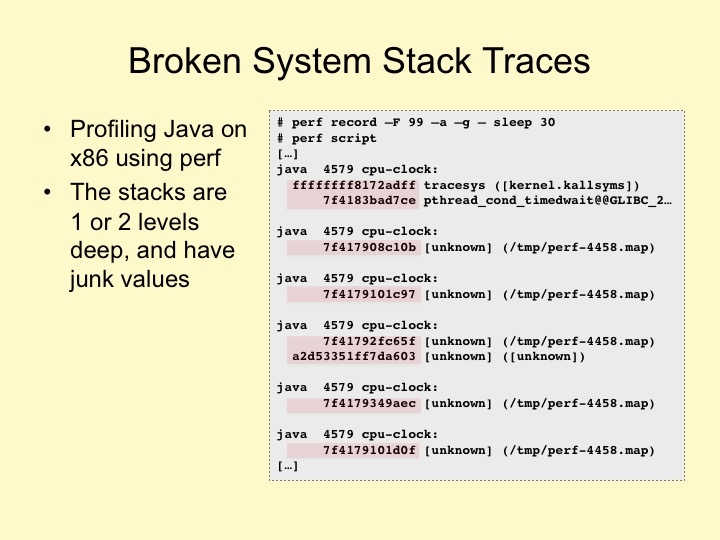
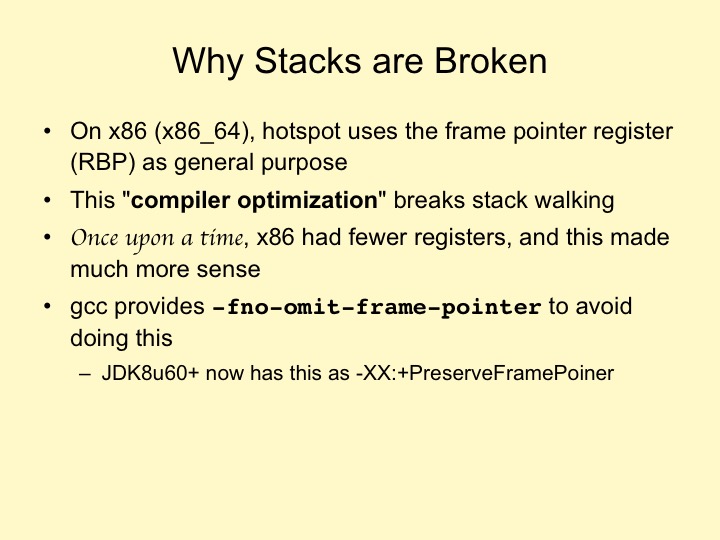
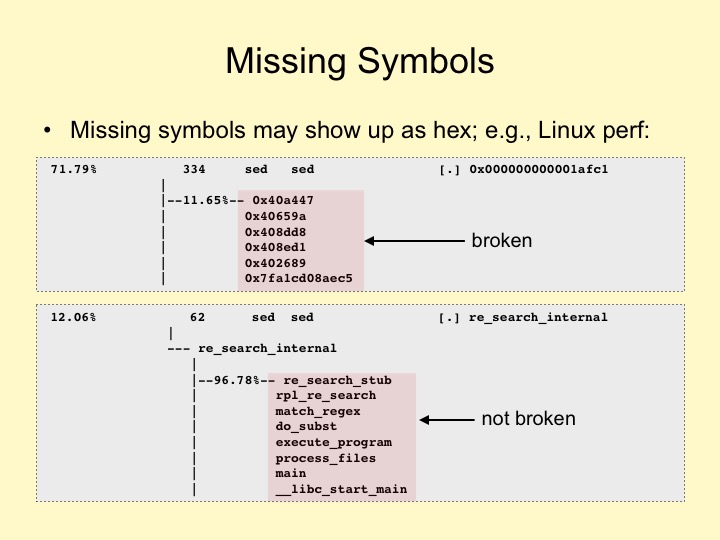
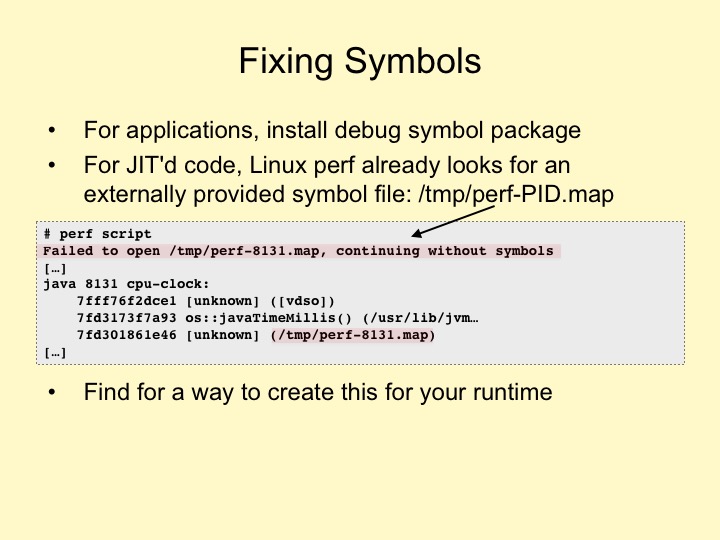
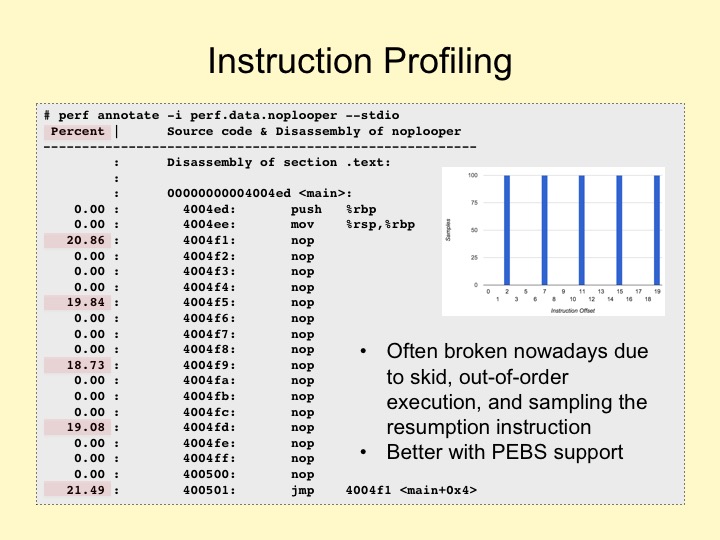
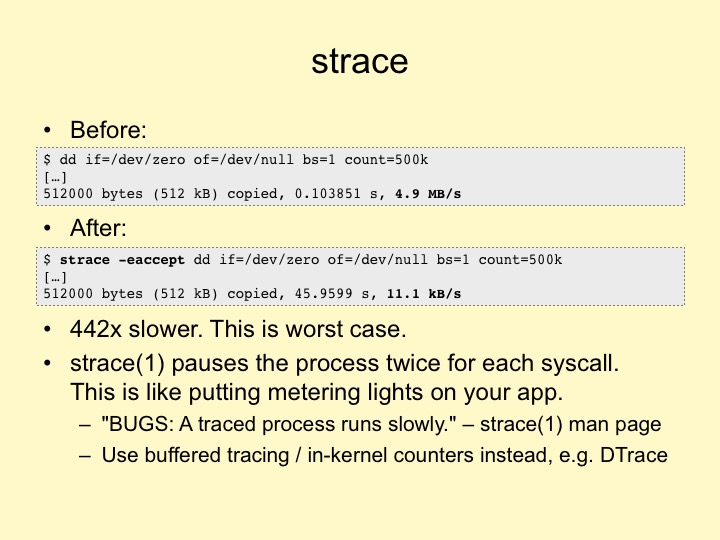
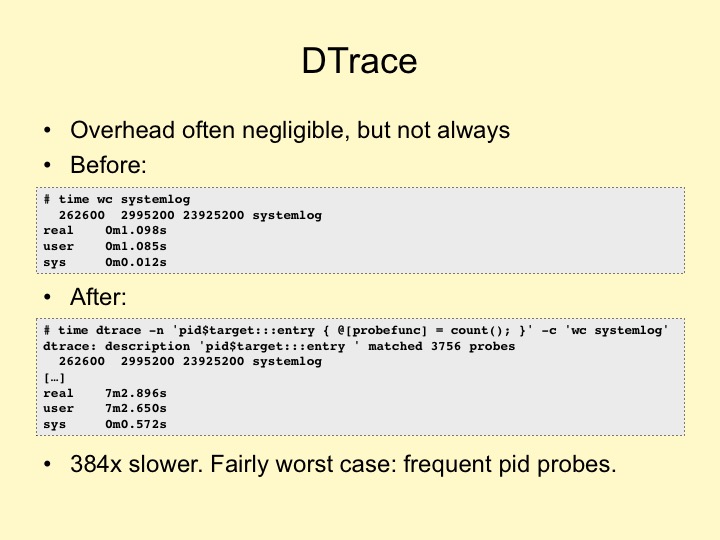
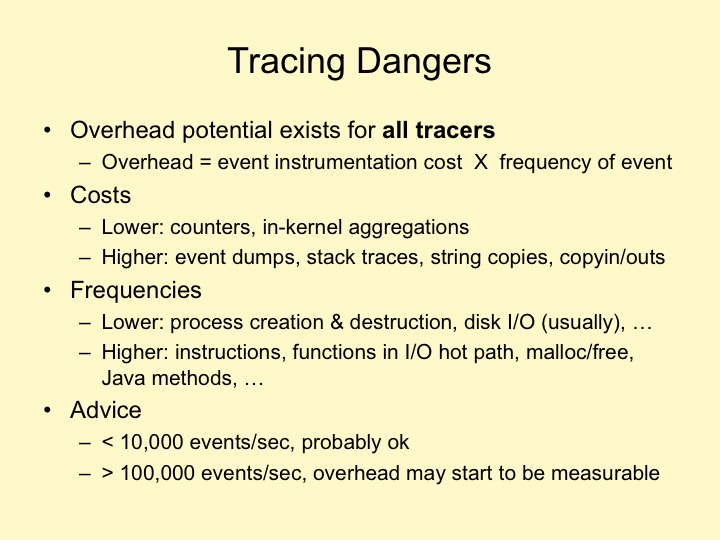
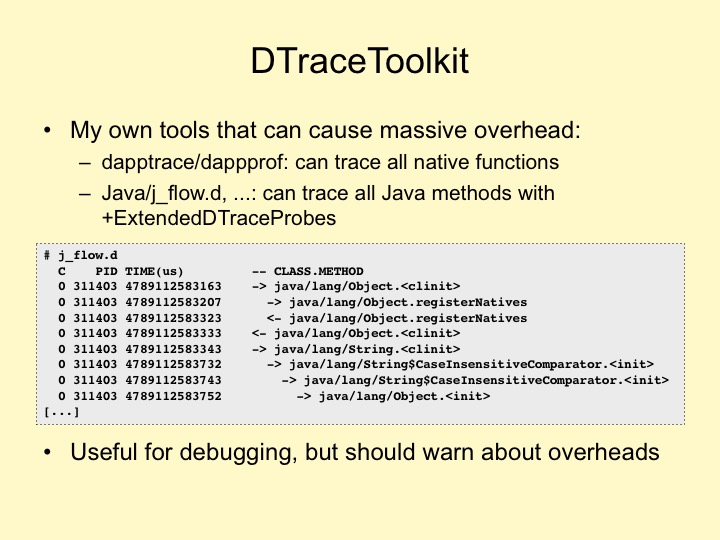
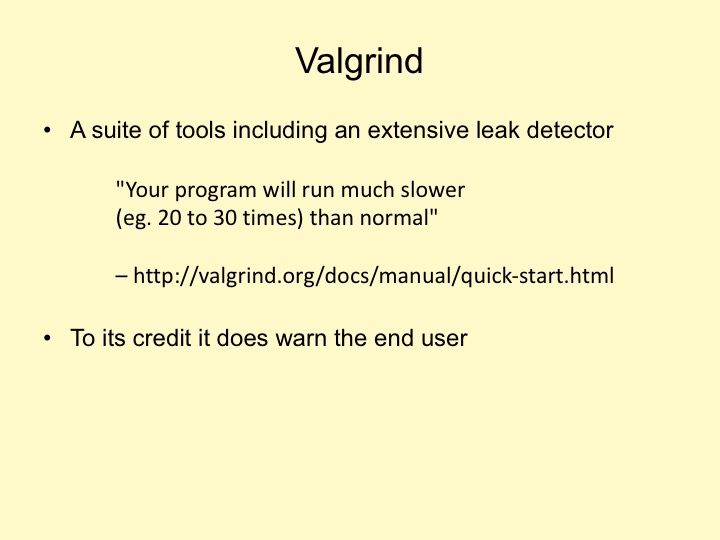
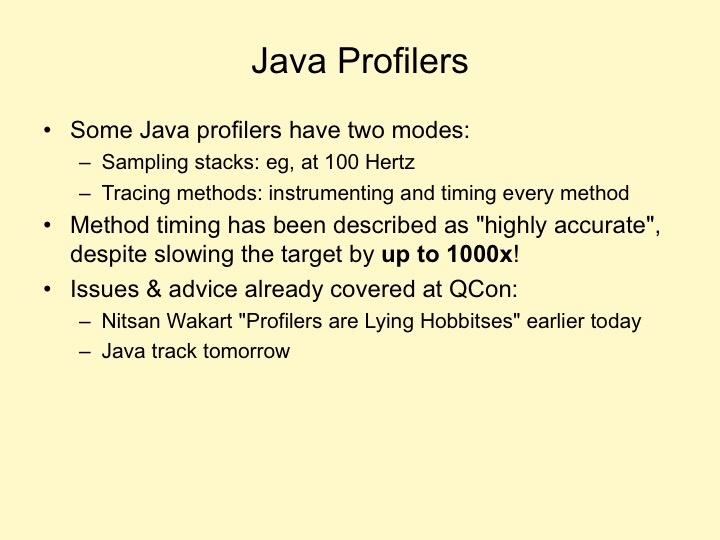
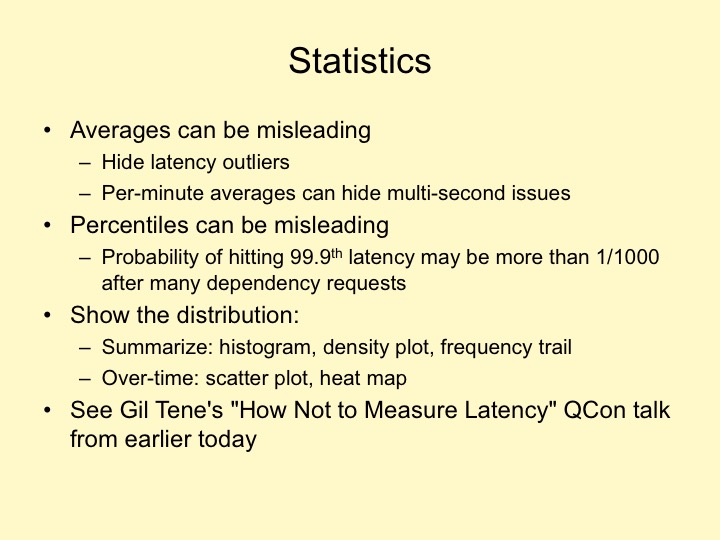
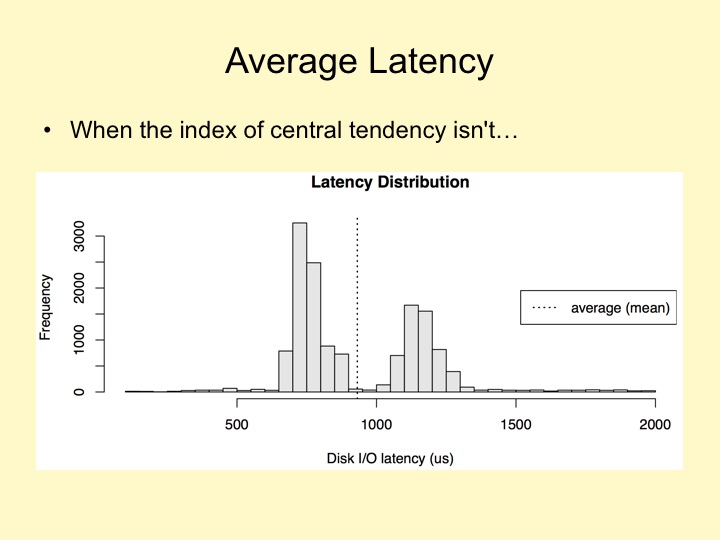
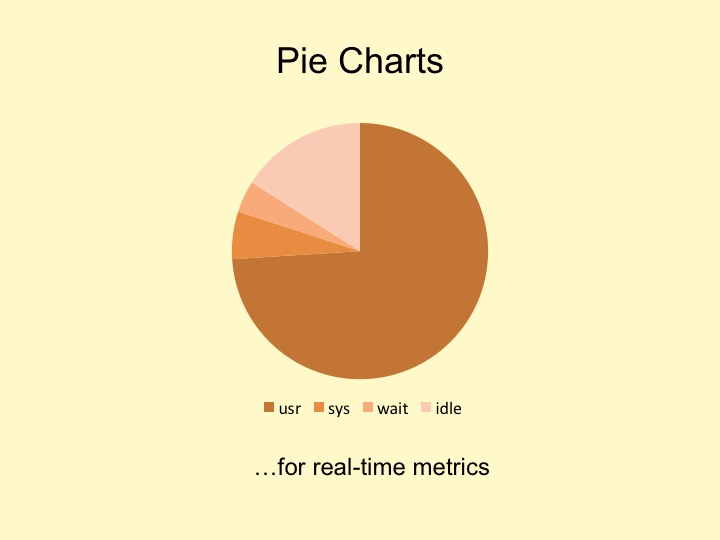
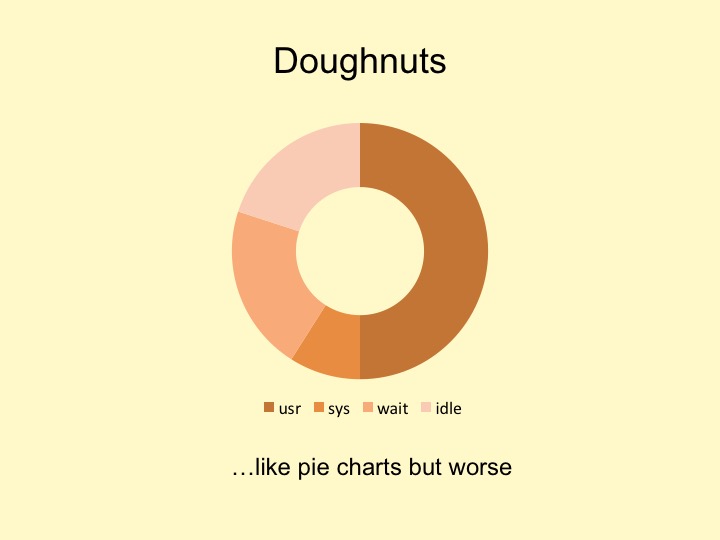
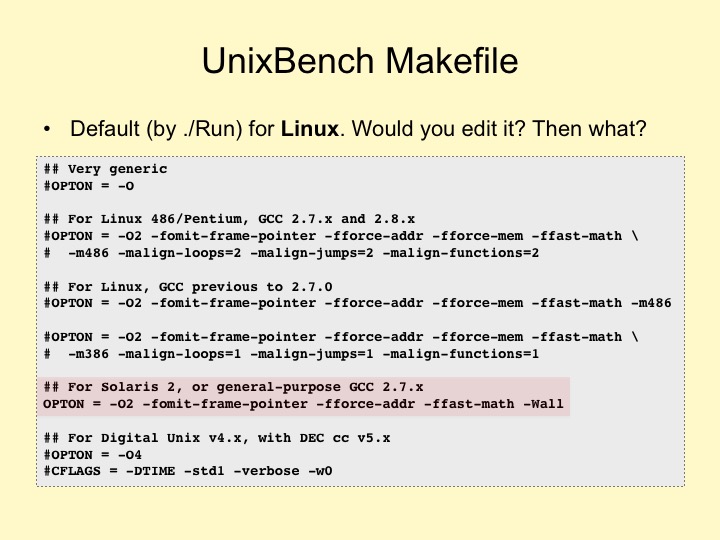
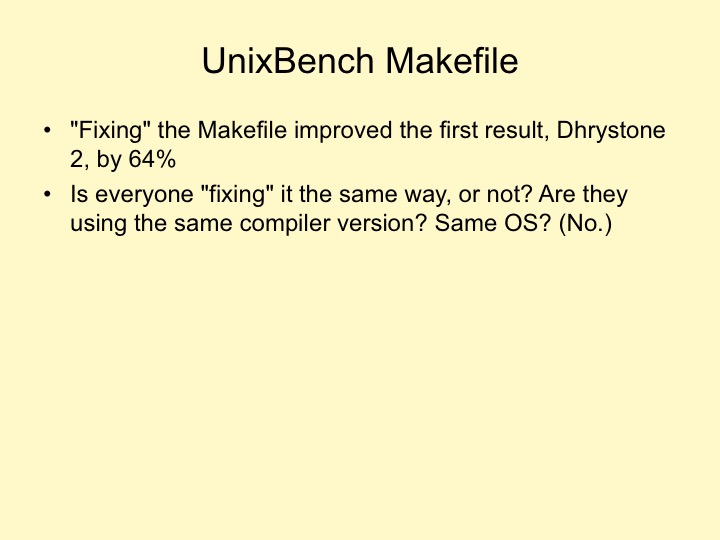
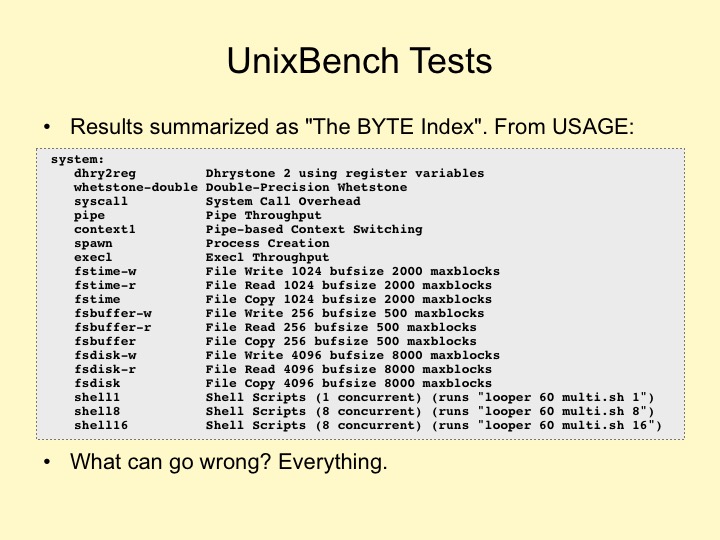
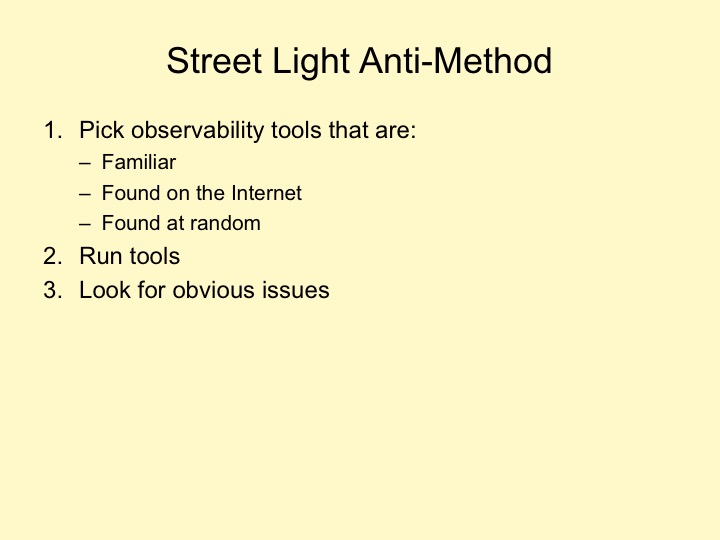
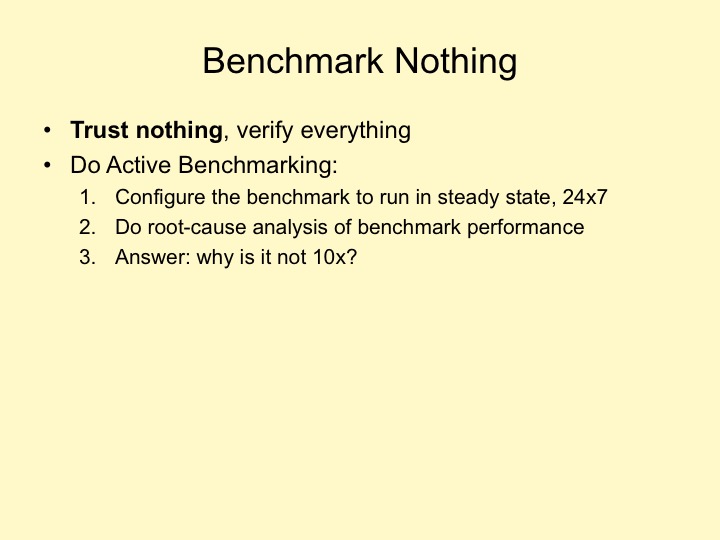
11、QCon 2015 Broken Performance Tools

分享一个Brendan Gregg大神(QCon 2015分享)

1.jpg

2.jpg

3.jpg

4.jpg

5.jpg

6.jpg

7.jpg

8.jpg

9.jpg

10.jpg

11.jpg

12.jpg

13.jpg

14.jpg

15.jpg

16.jpg

17.jpg

18.jpg

19.jpg

20.jpg

21.jpg

22.jpg

23.jpg

24.jpg

25.jpg

26.jpg

27.jpg

28.jpg

29.jpg

30.jpg

31.jpg

32.jpg

33.jpg

34.jpg

35.jpg

36.jpg

37.jpg

38.jpg

39.jpg

40.jpg

41.jpg

42.jpg

43.jpg

44.jpg

45.jpg

46.jpg

47.jpg

48.jpg

49.jpg

50.jpg

51.jpg

52.jpg

53.jpg

54.jpg

55.jpg

56.jpg

57.jpg

58.jpg

59.jpg

60.jpg

61.jpg

62.jpg

63.jpg

64.jpg

65.jpg

66.jpg

67.jpg

68.jpg

69.jpg

70.jpg

71.jpg

72.jpg

73.jpg

74.jpg

75.jpg

76.jpg

77.jpg

78.jpg

79.jpg

80.jpg

81.jpg

82.jpg

83.jpg

84.jpg

85.jpg

86.jpg

87.jpg

88.jpg

89.jpg

90.jpg

91.jpg

92.jpg

93.jpg

94.jpg

95.jpg

96.jpg

97.jpg

98.jpg

99.jpg

100.jpg

101.jpg

102.jpg

103.jpg

104.jpg

105.jpg

106.jpg

107.jpg

108.jpg

109.jpg

110.jpg

111.jpg

112.jpg

113.jpg

114.jpg

115.jpg

116.jpg

117.jpg

118.jpg

119.jpg

120.jpg

121.jpg

122.jpg

123.jpg

124.jpg

125.jpg

126.jpg

127.jpg

128.jpg